

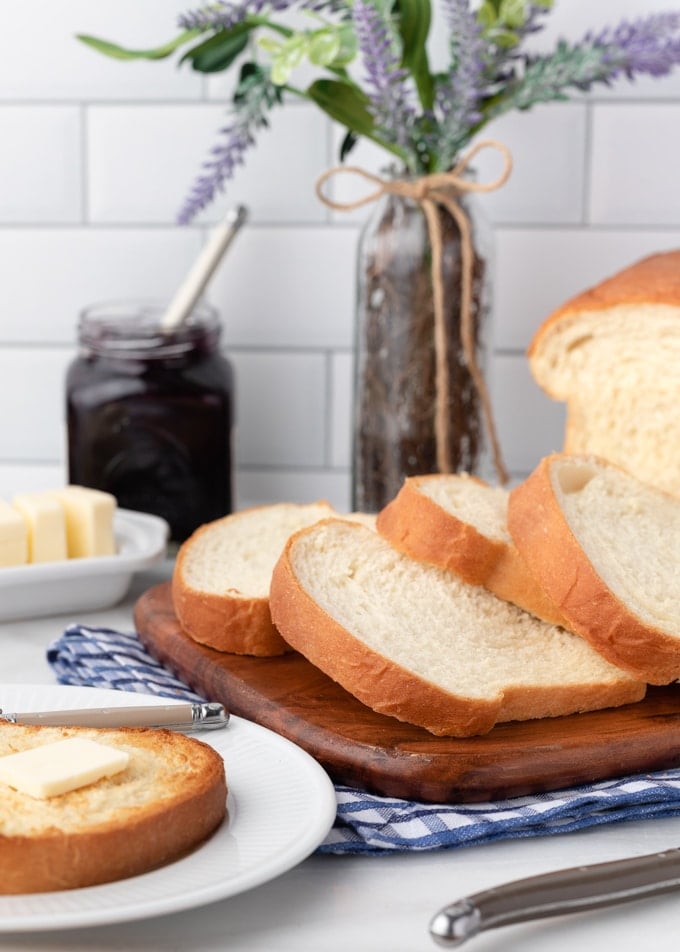
With a fluffy texture and soft, butter-topped crust, this homemade white bread is as versatile as it is delicious. This easy to follow recipe is a great place to start if you’re new to bread-making, and a classic for experienced bakers.
This post contains affiliate links. As an Amazon Associate, I earn a commission (at no additional cost to you) from qualifying purchases made by clicking these links. As always, all recommendations and opinions expressed are my own.
The first type of bread I ever baked was white bread. It was during a lengthy blizzard and we’d used up the loaves we bought from the store. Being the carb lover I am, I was craving toast with my eggs!
My mom gave me her recipe that day, and I carefully followed each step to the letter. The aroma that came out of the kitchen was coziness defined. As soon as I tasted it, I wanted to make all the types of bread at home.
Classic white bread is one of the easiest loaves to make. It’s a time commitment, but the results are worth it. This pillowy, butter-brushed loaf is better than any white bread I’ve ever bought!
I’ve written this homemade white bread tutorial for bakers of all skill levels. So, whether you’ve been churning loaves out of your oven for years, or this is your first attempt, I’ve loaded this post with visuals of every step, and every tip and trick I know.
If you have any questions as you’re reading or baking, please don’t hesitate to ask!
Want to bake bread and don’t have any yeast on hand? Try my Classic Beer Bread recipe for an easy and delicious quick-bread!

What You’ll Need from the Pantry
Making homemade white bread doesn’t require a lot of ingredients–just 7 in total, and most are staples. You’ll need flour (more on this below), active dry yeast, dry milk powder, table salt, softened unsalted butter, honey (or granulated sugar), and warm water.
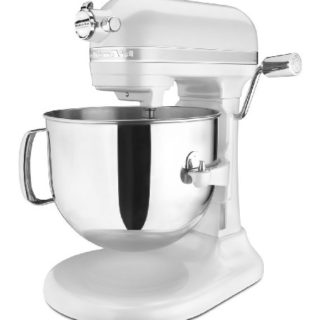
In terms of equipment, you’ll need an instant-read thermometer, a stand mixer fitted with the dough hook, a rolling pin, an 8 ½″ x 4 ½″ (or 9″ x 5″) loaf pan, a pastry brush, and a wire rack.
If you’re in the market for a stand mixer, here are two that I personally own and recommend. I used the 5-quart Artisan in this post.

KitchenAid Artisan Series 5-Qt. Stand Mixer
KitchenAid 7-Quart Pro Line Stand Mixer
What Kind of Flour Should I Use?
You can make this recipe with either bread flour or all purpose flour. Bread flour is always my first choice for most loaves. It has a higher protein content (12.7% protein for the King Arthur brand – “KA“), compared to all purpose (KA – 11.7%).
The extra protein in bread flour produces more gluten, which makes for a sturdier dough, and gives a baked loaf its characteristic “chew.” That said, white bread is one of the recipes that you can use either flour type with good results.
The texture of loaves baked with all-purpose flour will have minor differences from those made with bread flour. They’ll have a little less chew and the crumb will be ever-so-slightly less tight.
How to Make Homemade White Bread
To make things more manageable, I’ve broken this recipe down into 6 process categories: Proofing the Yeast, Mixing and Kneading the Dough, The First Rise, Shaping the Loaf, The Second Rise, and Baking the Loaf.
I know that it might sound like a lot of steps, but don’t be turned off by this! Much of the process is “hands off” while you wait for the yeast work its magic.
Proofing the Yeast
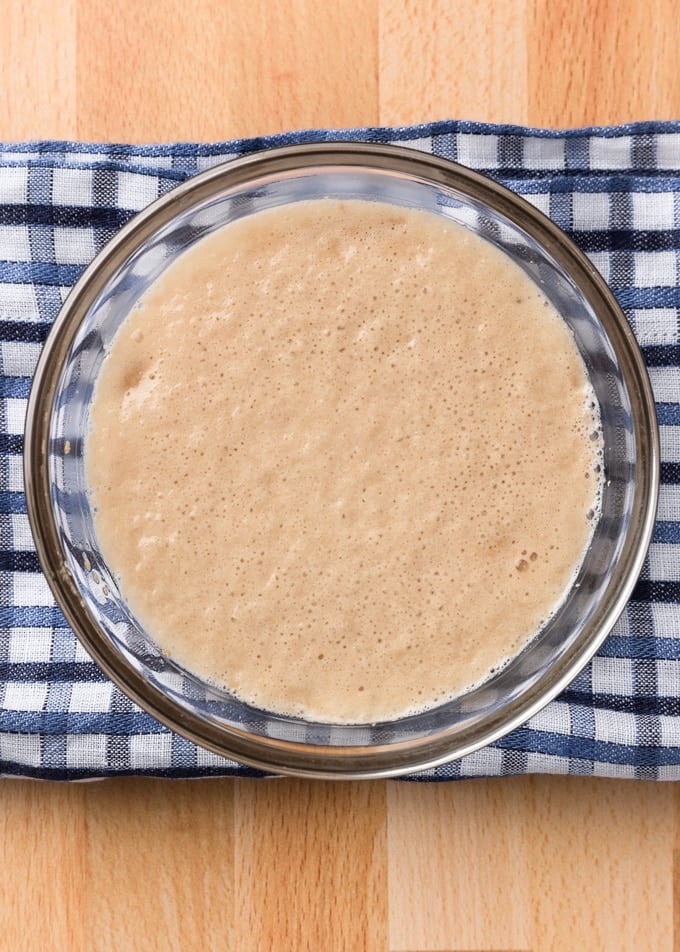
The first thing you need to do when working with active dry yeast is to proof it. This wakes the yeast up and lets you ensure that it’s fresh so you’ll get a good rise on your loaf.
To do this, mix half of the warm water with a little bit of the honey or sugar in the recipe, and stir in the yeast. You’ll need a thermometer for this (I use the Thermapen Mk4 in my kitchen).
The water temperature should be 100 to 110 degrees F. If the water is too cold, the yeast won’t proof. If it’s too hot, it will kill the yeast.
In about 5 to 10 minutes, the mixture will start to look foamy with little bubbles on the surface. If you don’t see foam and you used water within the temperature range, the yeast is no longer viable and you’ll need to discard it.
Mixing and Kneading the Dough
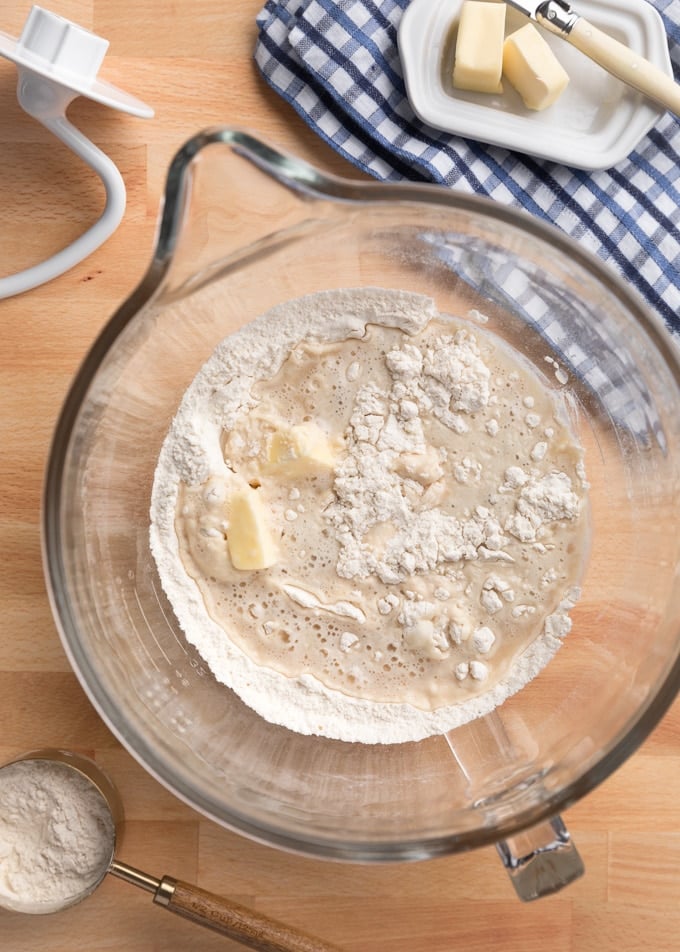
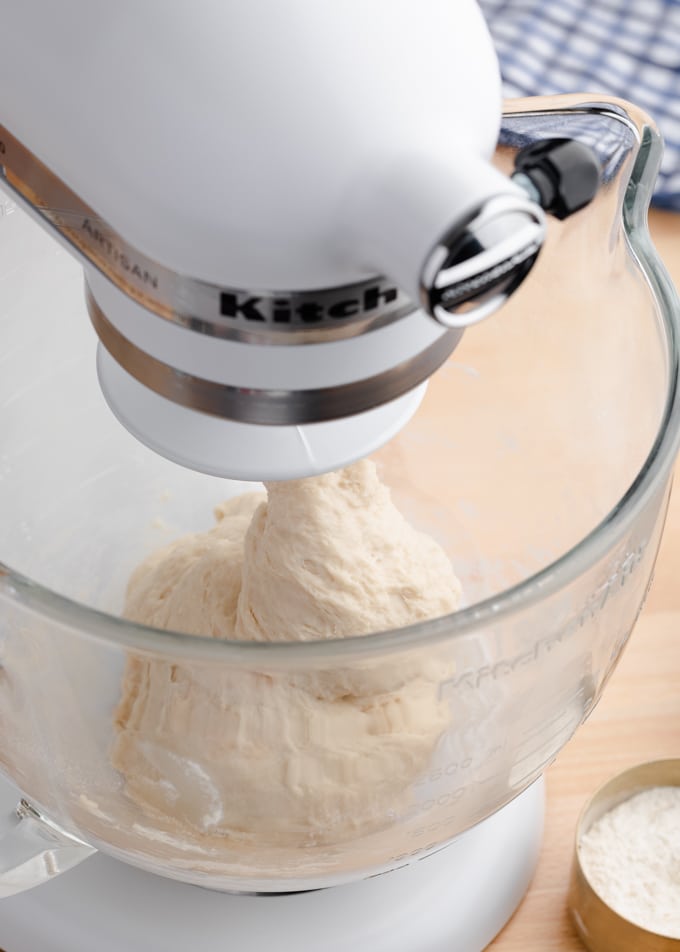
Using a stand mixer makes mixing and kneading bread dough a cinch. Once the yeast is proofed, place all of the ingredients in the mixer bowl. It’ll take 3-5 minutes to fully incorporate on low speed.
When you’re measuring your flour (using the spoon-and-level method), it’s important to measure out 3 cups, but only add 2-½ cups to the bowl initially.
How To Tell the Dough is the Right Texture
Once the 2-½ cups of flour have been incorporated, you’ll need to take a peek at the dough’s texture. It should be soft and tacky to the touch, but shouldn’t be so sticky that it clings to the sides of the bowl.
Add additional flour from your ½ cup reserve a tablespoonful at a time. The amount you use will depend on the humidity in your home and the time of year. For the dough photographed, I needed to add about 3 to 4 tablespoons.
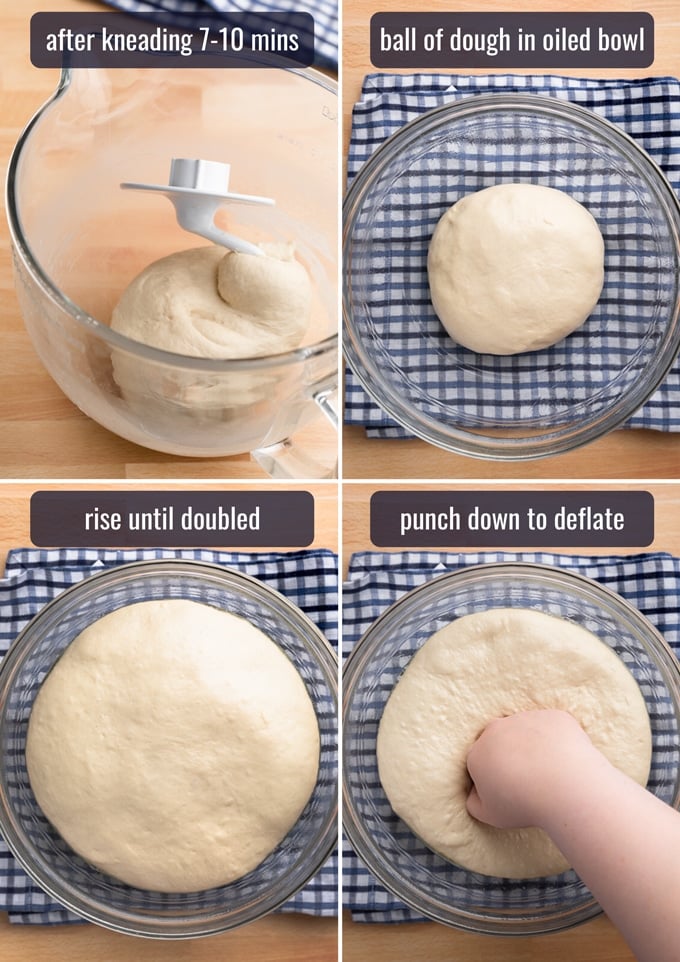
Once the dough is the proper texture, turn the mixer speed up one notch, and let it knead for 7-10 minutes. Look for a soft ball to form and the dough to have an elastic texture.
Why does kneading make the dough elastic? The very short answer: it develops the gluten in the flour (and will continue to develop during rising). To read more about the science behind it, check out “Yeast’s Crucial Roles in Breadbaking“ from Fine Cooking.
The First Rise
When finished kneading, you’re ready let the dough rise for the first time. This will take anywhere from 1-2 hours (sometimes more).
During the rise, the yeast will feed on the starches and sugars in the dough (fermentation). This will continue to develop the gluten, the loaf’s texture, and flavor.
Choose a large bowl that allows for the dough to double in size, and be sure to oil the bottom and sides. (You can use your stand mixer bowl to cut down on cleanup, as long as you oil it.)
Cover the bowl and place it in a spot in your kitchen that’s warm (but not too hot). It should take anywhere from 1-2 hours for the dough to double, depending on the proofing temperature.
It’s more important to rise the dough until it’s doubled than to stick to a timer for this process. Go by the visual here, not the clock.
Where’s the best place in your kitchen to let your dough rise? Check out these tips and tricks from Taste at Home. I use the proofing setting on my oven — check your manual to see if you have this setting too!
Shaping the Loaf
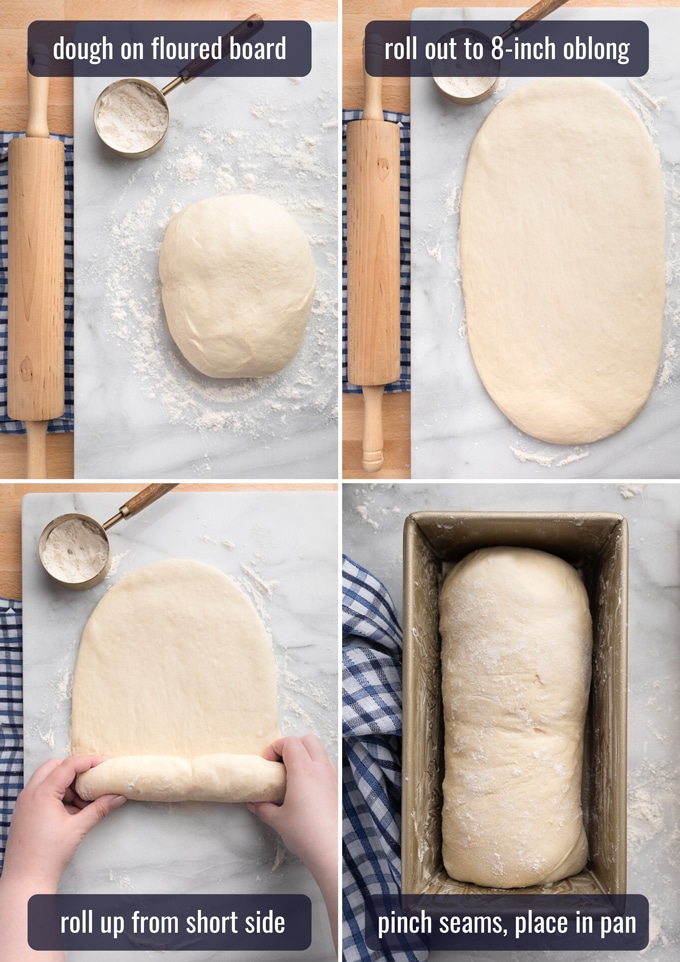
When the dough is doubled, gently punch it in the center to deflate it. Then, transfer it to a lightly-floured surface and use a rolling pin to roll out an oblong shape, 8 inches wide and ¼-inch thick.
As you’re rolling, if you see any big air bubbles in the dough, press them out. Otherwise, you’ll end up with gaps in the crumb when you slice it.
Starting at the 8-inch end, tightly roll up the dough until you reach the opposite end. You want to create a fairly smooth log, but not so tight that the dough tears.
Use your fingers to pinch the bottom and side seams together. Then, transfer the dough to a buttered/greased loaf pan with the bottom seam down.
The Second Rise
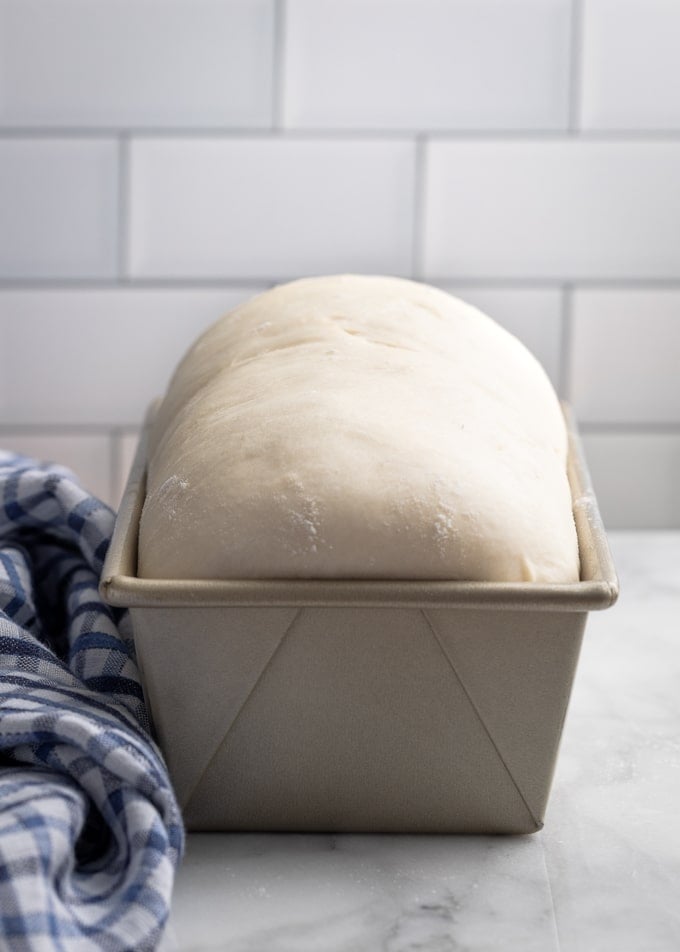
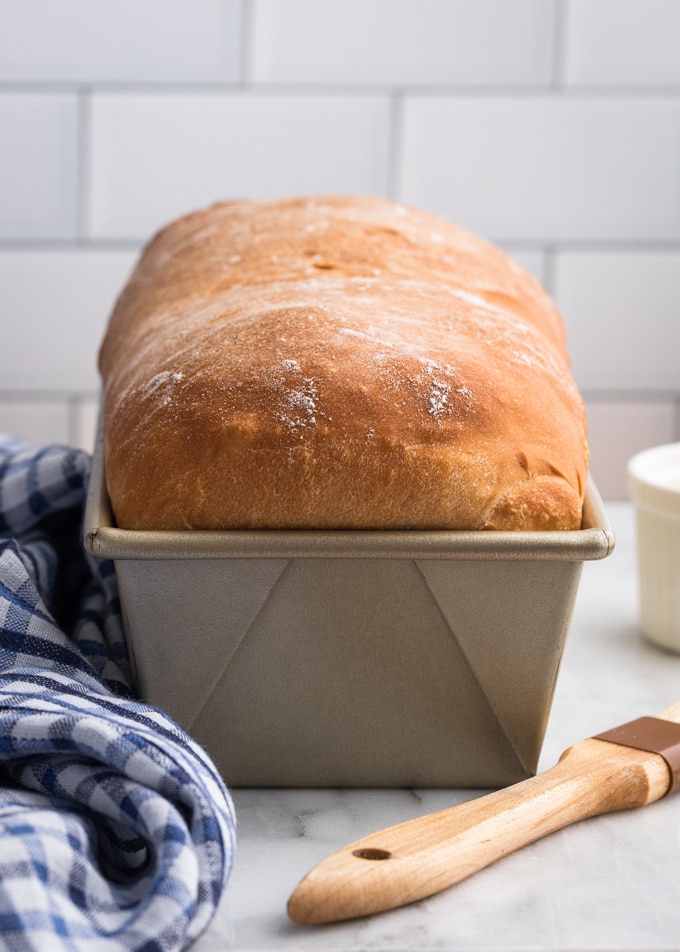
This is the last step before baking! The shaped loaf now has to rise in the loaf pan until it’s about 1- to 1-¼-inches higher than the top of the loaf pan. I like to loosely cover the pan with a piece of plastic wrap that I’ve lightly coated with cooking spray.
This will take about an hour, but just like the first rise, it could take a little longer. Don’t rush it!
Want to be sure your loaf is ready for baking? Gently press the top of the dough with your index finger. If the indentation remains and doesn’t puff back out, it’s ready to go.
Baking the White Bread: How to Know When It’s Ready
I bake my white bread at 350 degrees F for about 35 to 45 minutes. The loaf is ready when the crust is golden, the interior temperature reads 190-200 degrees F, and it sounds hollow when tapped.
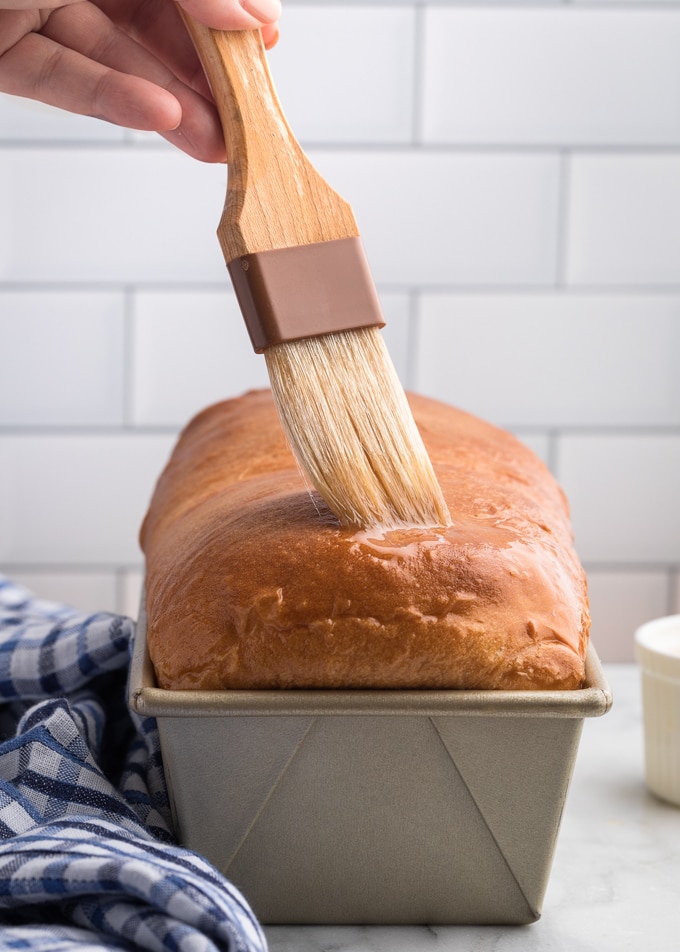
As soon as the bread comes out of the oven, I like to lightly brush the top with a little melted butter. This adds flavor and helps to give the loaf a sliceable, soft crust.
So that the sides and bottom don’t become soggy, take the bread out of the pan as soon as possible. I let it cool for only about 5 minutes before unmolding onto a wire rack to continue cooling.
Serving and Storing Homemade White Bread
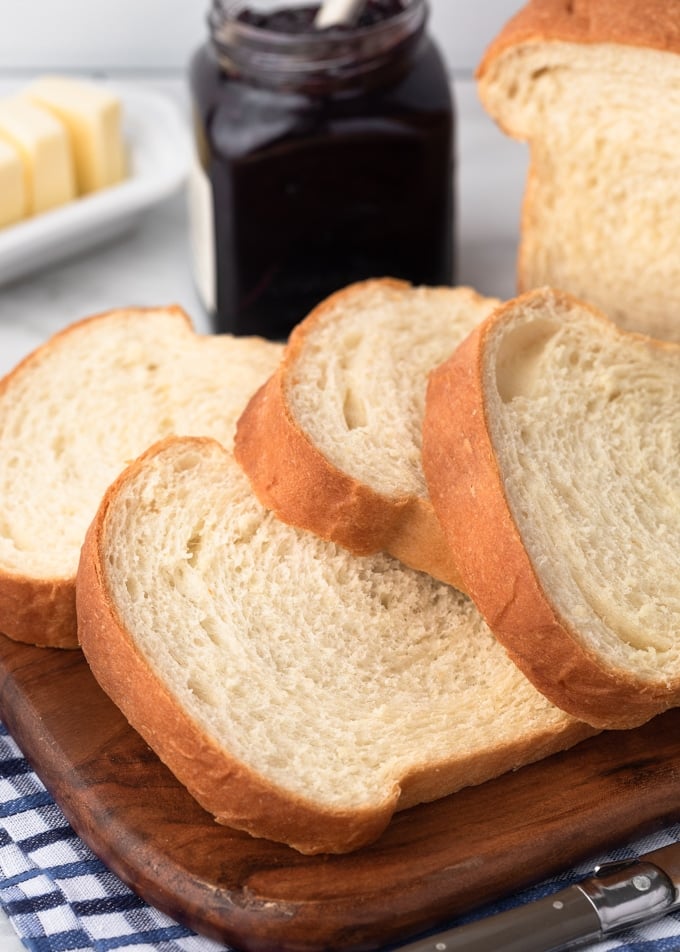
We love this bread the day it’s made, still slightly warm, with butter and jam. That said, I think I love it even more the next morning, lightly-toasted.
To store, I place the loaf in an airtight container or zip top bag once it’s fully cooled. It will stay fresh for 3-4 days at room temperature.
For longer storage, I like to slice the cooled loaf, place it in zip-top bags, and freeze for up to 3 months. You absolutely can wrap and freeze a full loaf, but I like to be able to pull single slices out as I need them.
This homemade white bread is equally great for cold sandwiches (like chicken salad) and warm sandwiches (like grilled cheese). It’s perfect with eggs for breakfast, and is wonderful spread with homemade peanut butter and/or jam for a snack.
CRAVING MORE? Subscribe to my newsletter and join me on Facebook, Pinterest, and Instagram for the latest recipes and news.

Homemade White Bread
Ingredients
- 2-½ to 3 cups bread flour or all-purpose flour (measured with a spoon-and-level method)
- 2-¼ teaspoons active dry yeast (1 packet)
- 2 tablespoons honey or granulated sugar , divided
- 1 cup warm water (105 to 110 degrees F), divided
- 3 tablespoons unsalted butter , divided (plus additional for pan)
- 1-½ teaspoons table salt
- 3 tablespoons dry milk powder
Instructions
Proof the Yeast
- In a small bowl, stir together ½ cup of the warm water, a teaspoonful of the honey or sugar, and the yeast. Let stand for 5 to 10 minutes until the mixture is foamy and small bubbles rise to the surface.
Mix and Knead the Dough
- While the yeast is proofing, whisk 2-½ cups flour, the salt, and the milk powder in the bowl of a stand mixer. Soften 2 tablespoons of butter, cut it into a few pieces, and add it to the mixer bowl with the rest of the honey (no need to stir).
- When the yeast is proofed, stir in the remaining ½ cup of water, and add the entire liquid mixture to the dry ingredients in the stand mixer.
- Fit the mixer with the dough hook and mix on low speed for 3-5 minutes, until all of the flour is incorporated. Check the dough consistency. It should be slightly tacky to the touch, but not sticking heavily to the sides of the bowl. It's ok if it gently sticks in a small circle to the center of the bottom. If needed, add some of the remaining ½ cup of flour a tablespoon at a time, mixing to incorporate after each addition, until the described consistency is reached.
- Increase the mixer speed by one notch and let the dough knead for 7-10 minutes, until a soft ball forms that has an elastic texture.
- Lightly oil the bottom and sides of a large bowl. Add the dough ball to the bowl and gently roll it around so it has a light coating of oil on all sides. Cover the bowl with a towel or plastic wrap and let it rise at room temperature, in a bread proofer, or in a warm (not hot) spot in your kitchen, for 1-2 hours, until doubled in size.
Shaping the Loaf
- Butter an 8-½ x 4/-½ or 9×5-inch loaf pan. Set aside.
- Punch the risen dough down to deflate it. Place the dough on a floured board and roll it out to an 8-inch wide oblong shape, about ¼ inch thick. If you see any large air bubbles in the dough, press them out.
- Starting at the short end, tightly roll up the dough to a log. Pinch the bottom and side seams to seal. Place the dough, bottom seam side down, in the prepared pan.
- Loosely cover the pan with a piece of plastic wrap sprayed with cooking spray and let the dough rise for another 1-2 hours, until it is 1 to 1-¼ inches higher than the top of the loaf pan.
Bake the Bread
- When the dough is almost finished with its second rise, preheat the oven to 350 degrees F, with the rack in the lower third of the oven.
- Uncover the pan and bake the bread for 35-45 minutes. The bread is ready when the top is golden, the center reads 190-200 degrees F on an instant read thermometer, and the loaf sounds hollow when tapped.
- Melt the remaining 1 tablespoon of butter and brush it over the top of the loaf when you take it out of the oven. Let the bread cool in the loaf pan for 5 minutes. Use a thin knife to loosen the sides from the pan and turn the bread out onto a wire rack to cool.
- Slice the bread when just slightly warm or room temperature and serve.
Kristina Zoghets says
Thanks for the recipe! Can I leave out the dry milk? Will it matter?
Amanda Biddle says
Hi Kristina,
I haven’t tried it personally with this loaf, but in general, if you omit dry milk from a bread recipe, the crumb will be a little less tender and the crust won’t be as golden. It will also be a bit blander in flavor. Are you looking to make a dairy free loaf?
Tina says
What a great tutorial, thanks again for a great recipe. I love baking bread or making flatbreads. I have never made white sandwich bread before, I will have to give this a try soon.