
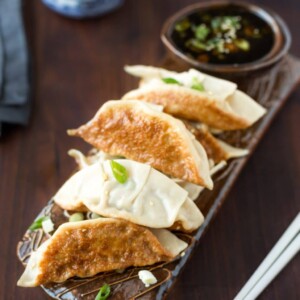
Cooked in a classic combination method of pan-frying and steaming, these tender, crisp-bottomed Chicken Potstickers are delicious and easy!

I love making my own “takeout” at home. It’s such a fun cooking theme, both for weeknight dinners and entertaining friends.
While I’ve often ordered potstickers in restaurants and purchased them ready-to-cook in the grocery store, I was surprised to learn how easy they are to make yourself.
In our favorite Chicken Potstickers, I combine ground chicken, cabbage, carrots, ginger, garlic, scallions, soy sauce, and toasted sesame oil for a fresh filling that’s big on flavor.
These tender, crisp-bottomed dumplings are delicious served alongside a honey-soy dipping sauce, with an optional touch of Sriracha for a light kick.
Plus, you can assemble them ahead of time and freeze them for later use, making wholesome, homemade potstickers just as convenient as store-bought. Sounds like a plan to me!


The key to making excellent potstickers at home is the wrapper. If possible, you want to look for “gyoza wrappers” or “dumpling skins” instead of wontons.
Many regular grocery stores are carrying them these days (look for them in the refrigerated section, near the tofu), though if you have access to an Asian market, you’ll be treated to a much greater selection of authentic choices.
While wonton skins are workable for this recipe (and I’ve used them many times myself), they’re a bit thinner than what is usually used for potstickers.
The gyoza or dumpling wrappers stand up better to the filling and are easier to pleat and cook without tearing. If you can find them, they’re definitely worth it!


Potstickers do take a bit of time to fill and shape, but once you’re comfortable with the technique, the process gets quicker.
Even better than assembling them alone: invite your friends over for a potsticker party and let everyone get in on the fun!
To assemble, place a dollop of filling in the center of the wrapper (resist the urge to overfill), dampen the perimeter with water, and fold the wrapper in half over the filling.
Use your thumb and forefinger to fold anywhere from 3-6 pleats in the top layer of the wrapper (I find I can add more pleats as I get in my assembly groove), keeping the bottom layer of the wrapper flat. The dumpling will naturally form a crescent shape with a flat base, but you can help it along if necessary.
The most important thing is that the potsticker edges are sealed, and that you’ve pressed out any air in the dumpling as you’ve pleated them so they don’t split when steamed.
If you like, you can get creative with your pleats as you go along, but trust me when I say that even if the pleats aren’t perfect (mine never are), the potstickers will still taste delicious!

I like to use the classic potsticker cooking method of fry-steam-fry: brown the bottoms of the potstickers, steam them through, and give them a final crisp in the pan before serving. The two-stage crisping gives the potstickers a nice contrast of texture and color.
As I mentioned, the dumplings can be filled and folded in advance and frozen, uncooked. Place the assembled potstickers on a parchment-lined baking sheet in a single layer and freeze until solid. Then, just transfer to a zip-top freezer bag for up to 3 months.
When you’re ready to serve, cook as directed in the recipe (no need to defrost), increasing the steaming time by a few minutes until the dumplings are cooked through.
Fresh or frozen, homemade potstickers are an easy and delicious treat for an appetizer or light meal!
Chicken Potstickers
Ingredients
FOR THE POTSTICKERS
- 2 cups chopped cabbage (I finely shred, then chop up long strands)
- 1-1/4 teaspoons Kosher salt , divided, plus additional to taste
- 1 pound ground chicken
- ⅓ cup finely chopped carrots
- ¼ cup thinly sliced scallions
- 1 teaspoon grated fresh ginger (I use a microplane)
- 2 cloves garlic , minced
- 1 tablespoon soy sauce
- 1 tablespoon toasted sesame oil
- ½ teaspoon granulated sugar
- ¼ teaspoon white pepper , plus additional to taste
- 36 round dumpling wrappers (gyoza), about 3-3/4 inch diameter
- room temperature water for sealing the dumplings , and 1 cup hot water, divided, for steaming them
- ¼ cup vegetable oil , divided, for frying the potstickers
FOR THE DIPPING SAUCE
- ¼ cup soy sauce
- 2 tablespoons rice wine vinegar
- 2 tablespoons honey
- 2 teaspoons toasted sesame oil
- 1 tablespoon thinly-sliced scallions
- Sriracha sauce , to taste (optional, I use 1-2 small squirts)
Instructions
- Toss cabbage with 1 teaspoon kosher salt and place in a colander set in a bowl. Let sit for 20 minutes, then transfer cabbage to a clean dish towel and squeeze out as much liquid as you can. Remaining cabbage should total about 1 cup.
MAKE THE POTSTICKERS
- In a large bowl, mix together ground chicken, carrots, cabbage, scallions, ginger, garlic, soy sauce, sesame oil, granulated sugar, 1/4 teaspoon Kosher salt, and white pepper. Cook a small dollop of the filling in a lightly-oiled non-stick skillet on the stove to taste for seasoning. Adjust salt and pepper to taste.
- Fill a small bowl with water. Place about 1 tablespoon filling in the center of a dumpling wrapper. Use your finger or a pastry brush to dampen the perimeter of the wrapper with water (don’t soak). Fold the wrapper in half. Use your thumb and forefinger to gently pleat the top layer of the wrapper 3-6 times across, squeezing out any air in the dumpling. Stand the pleated dumpling upright, pinching edges to seal.
- Keep wrappers covered with a towel while working so they don’t dry out. Transfer dumplings to a parchment-lined baking sheet and cover with a towel while you finish filling the remaining potstickers.
- In a 12-inch nonstick skillet over medium high heat, warm 2 tablespoons oil until shimmering. Stand half of the dumplings in the pan, flat side down, and cook until bottoms are golden brown and crisp, about 2 minutes, gently shaking pan occasionally.
- Carefully add 1/2 cup hot water to the pan (oil might sputter) and immediately cover with a tight-fitting lid. Reduce heat to medium and steam for 8-10 minutes, until dumplings are cooked through.
- Remove lid, increase heat, and allow any remaining water to evaporate, cooking until potsticker bases are re-crisped, about 2 minutes. Remove from pan and repeat with remaining oil and potstickers. Serve immediately, crisped side up, with dipping sauce.
MAKE THE DIPPING SAUCE
- In a bowl, whisk together all ingredients. If desired, garnish sauce and plated potstickers with additional sliced scallions and toasted sesame seeds.
Nutrition Estimate
Nutrition information is automatically calculated, so should only be used as an approximation.
Please note that our recipes have been developed using the US Customary measurement system and have not been tested for high altitude/elevation cooking and baking.
You may also like:
Dips & Spreads
Mexican Street Corn Dip
Dips & Spreads
Crab Rangoon Dip
Dips & Spreads
Chorizo Bean Dip with Chipotle

Appetizers

I made these Monday and they were AMAZING!!!! Excellent recipe and instructions. It took me a little while to get the hang of the pleating but after a few they looked professional. Results were perfect dumplings and so much better than carryout. Will definitely be making these again!!!
I’m so in love with these! I actually have some gyoza so im soooo gonna make this!!! Awesome video too!
These look so gorgeous, pinning for later and sharing, I want to make these!,
I love potstickers. I have always been too lazy and always bought the frozen ones, but these are for sure on my cooking bucket list. I love that you can freeze the ones that you make at home. I will for sure be making these soon and stocking up.
This is something I have never tried making myself, but I love eating them!! Time to start making them on my own! You provide great directions and your photos look fantastic!!
Oh wow these look so perfect! I never knew that the frying was a two-step process. And I love that you can freeze them. Just make one huge batch and enjoy them for a while. So smart!
Such beautiful photos of my favorite food! Thanks for the step by step photos to help make this recipe!
They look perfect! how fun
These look absolutely amazing, i could eat them through my screen !
I love potstickers and I’m sure these are a hundred times better than the frozen ones from the market. Would love to try my hand at making these at home!
Potstickers make such a satisfying snack. Bet these will be popular at a party!
They are, definitely! They disappear quickly. Thanks for commenting, Christine!
Your potstickers looks awesome. I love potstickers but have never made them at home. Now I will have to give it a try.
They really are delicious to make at home, Gloria, I hope you give them a try!
Delicioso , thank you Amanda.
Thanks, Maricruz! :)
My neighbor was just asking if I knew of a good potsticker recipe, no kidding! Ha, perfect timing! I can’t wait to share this with her. Your pictures are beautiful!
Thanks so much! Glad I could help, Cindy! :)
Potstickers are a favorite in my family. I have never tried to make them myself. I need to give this recipe a try!
I hope you enjoy them, Kelly!