

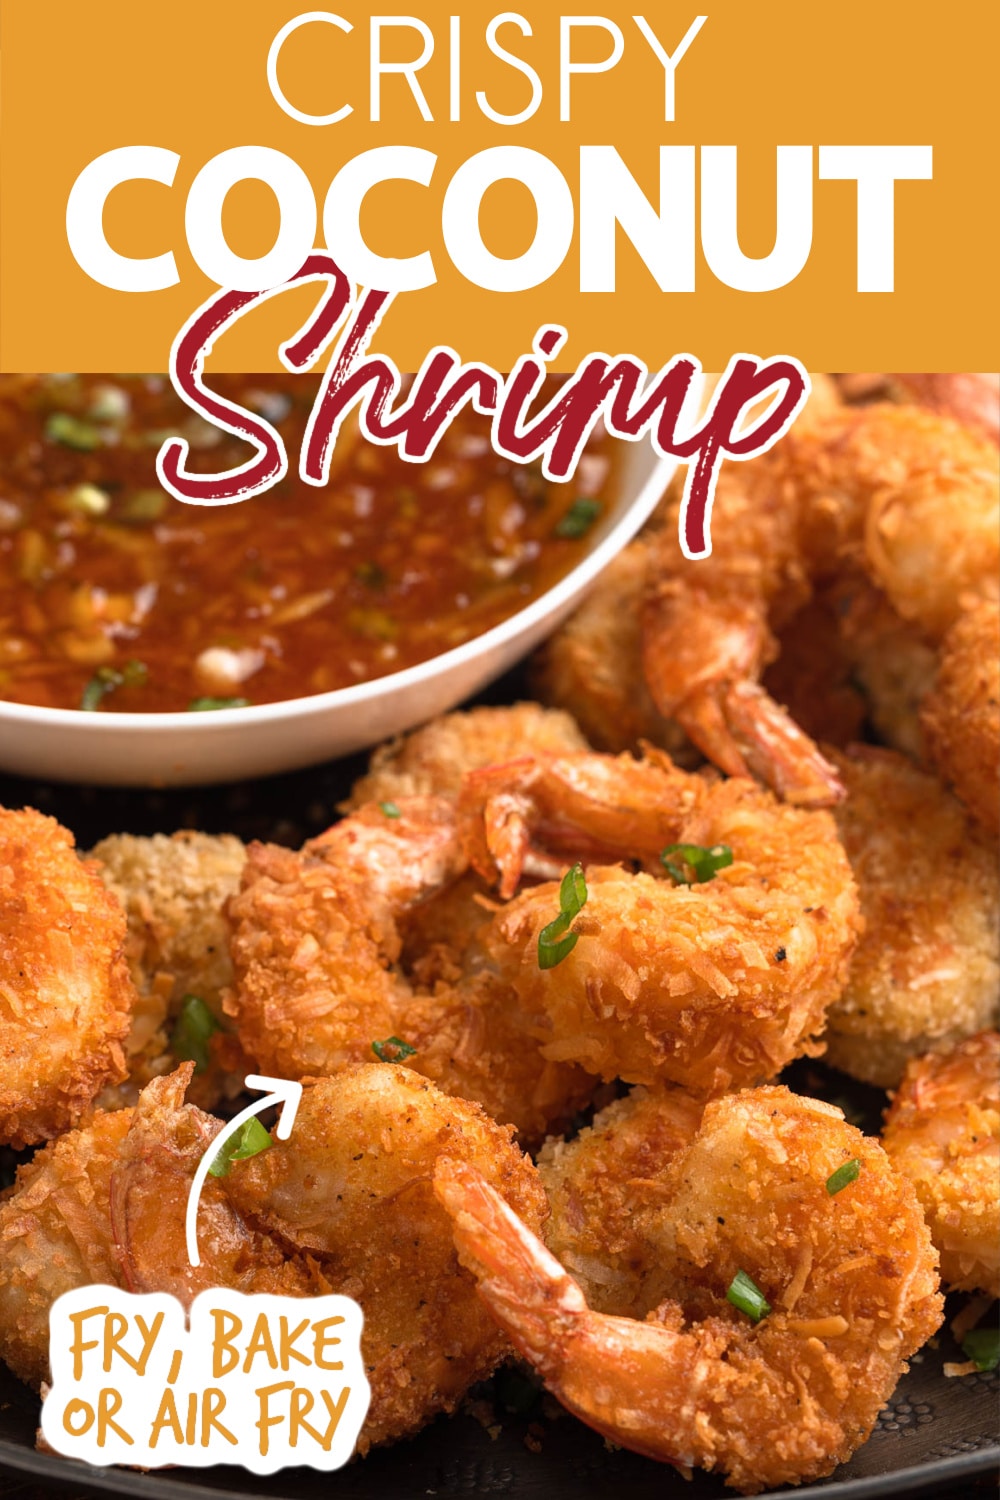
Lightly sweet, satisfyingly crunchy, and perfect for dipping, Coconut Shrimp are a crowd-favorite appetizer year-round! Whether deep-fried, baked, or air-fried, this recipe makes an easy, crowd-pleasing bite for game day, summertime poolside gatherings, or holiday parties.
Before You Start Cooking
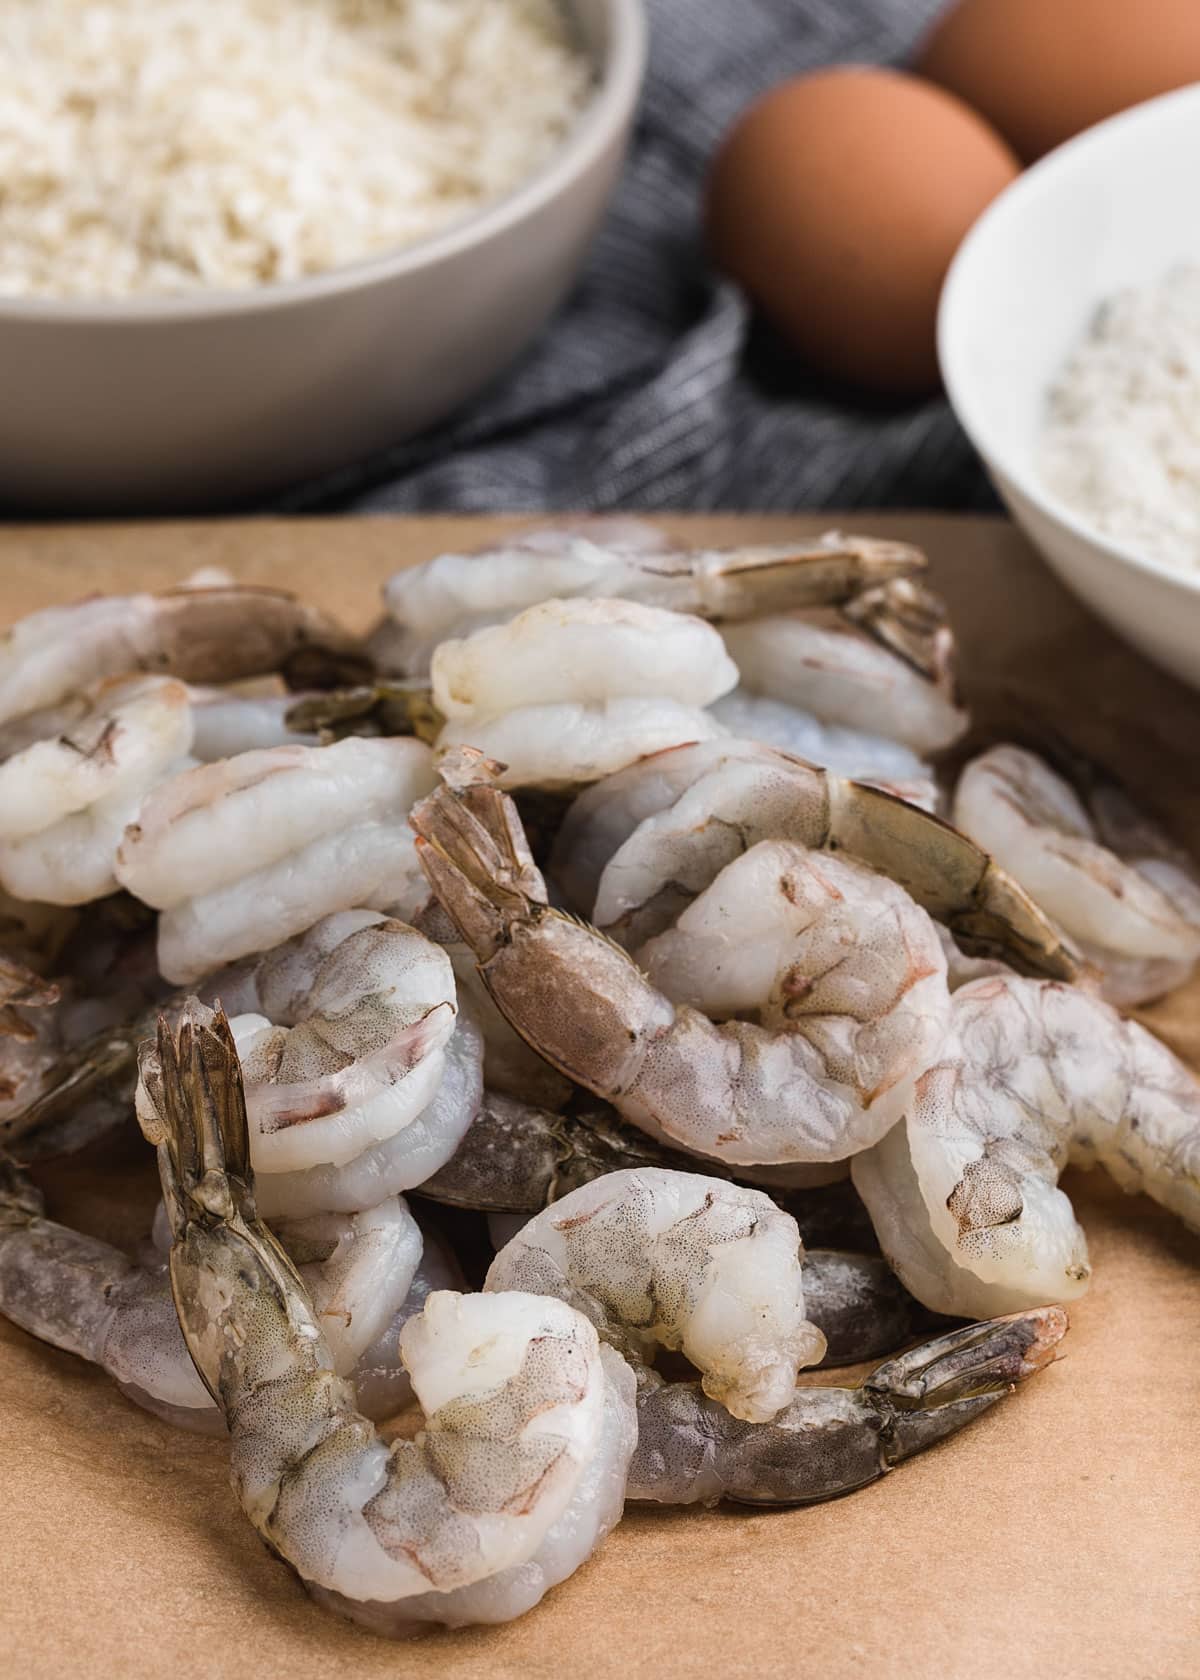
- Shrimp: You’ll need raw, deveined, and shelled shrimp with the tails left on (a built-in dipping handle!). I recommend 16/20 count—they’re large enough to look impressive on a platter and cook at an even rate with the breading, but not so big that dipping becomes awkward.
- Shopping: Check out my Shrimp Sizing Guide for shopping tips before heading to the market.
- Cooking Method: You can deep-fry, bake, or air-fry these Coconut Shrimp. Each has its pros and cons, so check out the Comparing Cooking Methods section below to decide which works best for you.
How to Make Coconut Shrimp
Step 1: Bread the Shrimp
If you’re using frozen raw shrimp, be sure to defrost them fully and pat them dry with paper towels to remove excess water before breading.
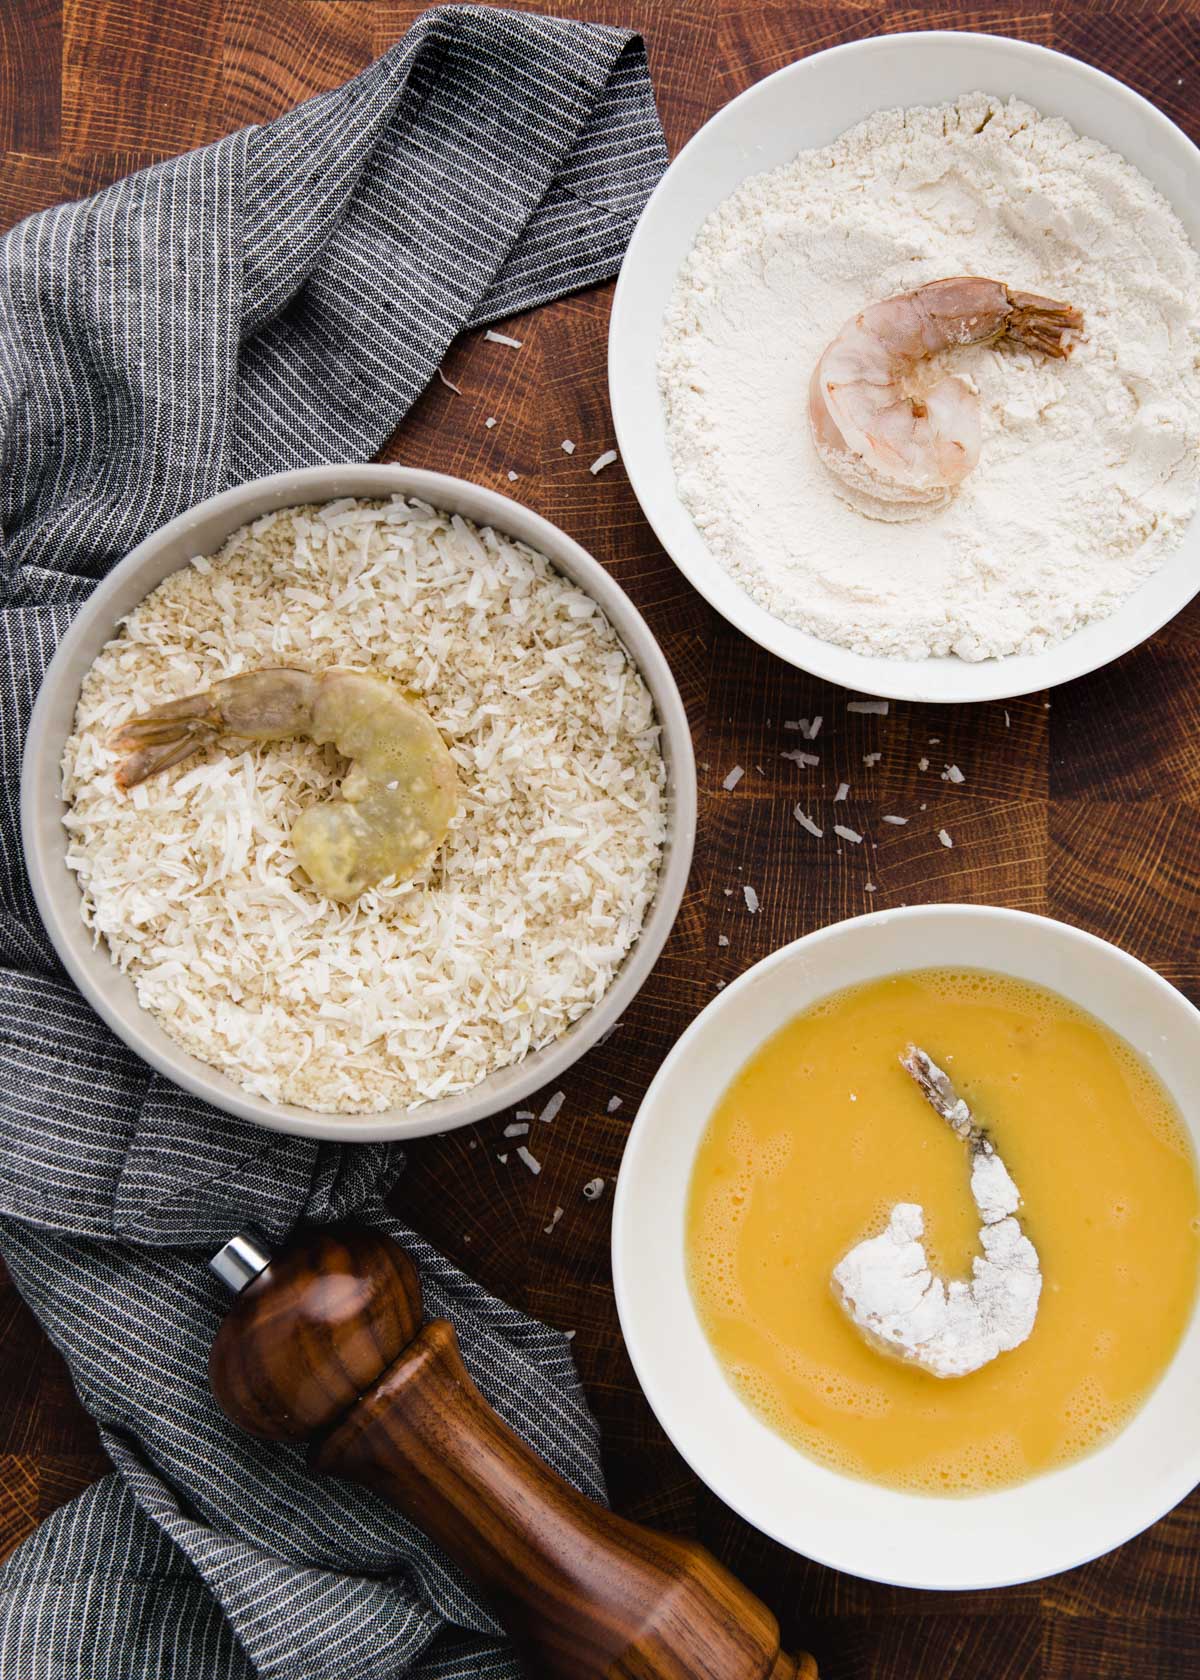
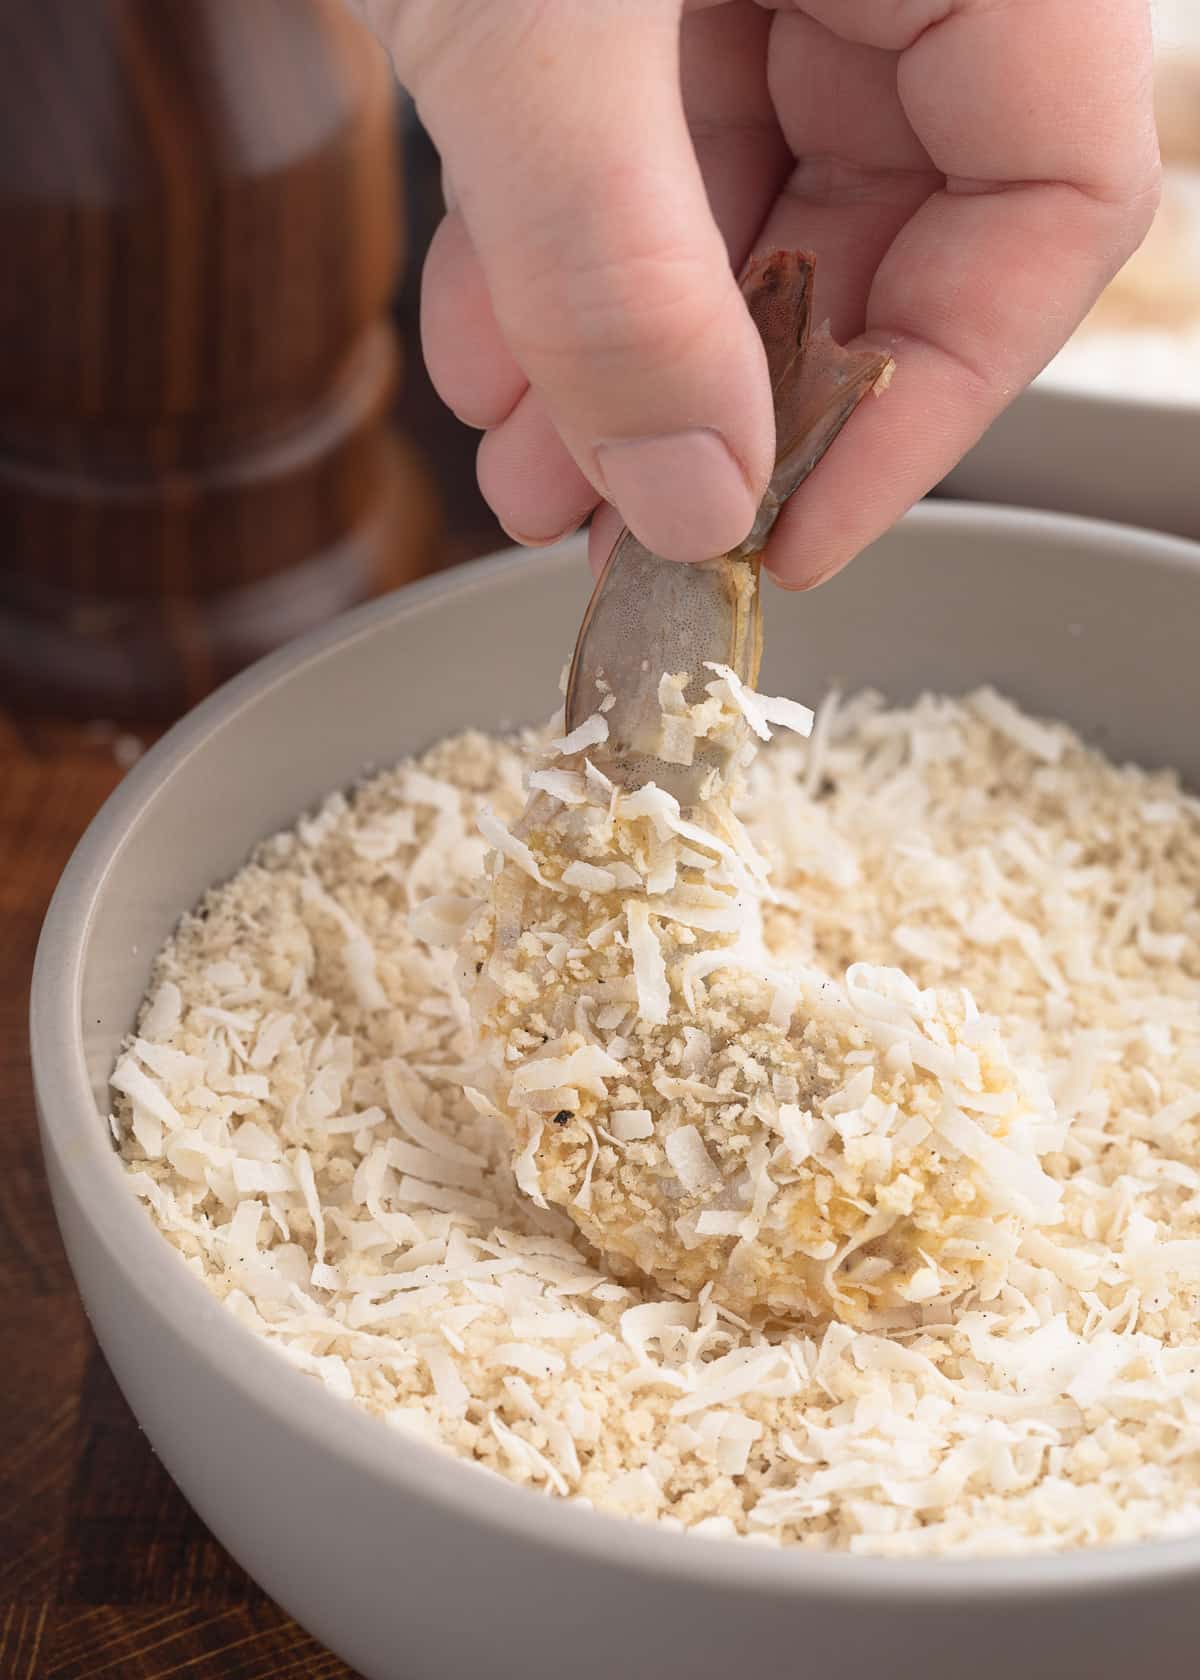
I use a classic three-step breading process for Coconut Shrimp: flour, egg, and a crisp coconut-panko breadcrumb coating. Set up three shallow bowls or trays for easy breading.
- Flour: Dredge the cleaned shrimp in all-purpose flour seasoned with a pinch of kosher salt and freshly ground black pepper. Shake off any excess—this layer helps the egg adhere.
- Egg Wash: Beat whole eggs with a splash of cool water. Dip the floured shrimp, letting any excess egg drip off.
- Crunchy Coating: Combine shredded coconut and plain panko breadcrumbs, seasoning with salt and pepper. Press the shrimp gently into the coating so it adheres evenly.
Coconut type: You can use either sweetened or unsweetened shredded coconut (not flaked or desiccated) for this recipe. I prefer unsweetened since we serve the shrimp with a sweet-spicy dipping sauce—in this case, sweetened coconut makes the whole bite a bit too sugary for me.
If you prefer sweeter Coconut Shrimp or aren’t serving a sweet dipping sauce, use sweetened coconut.
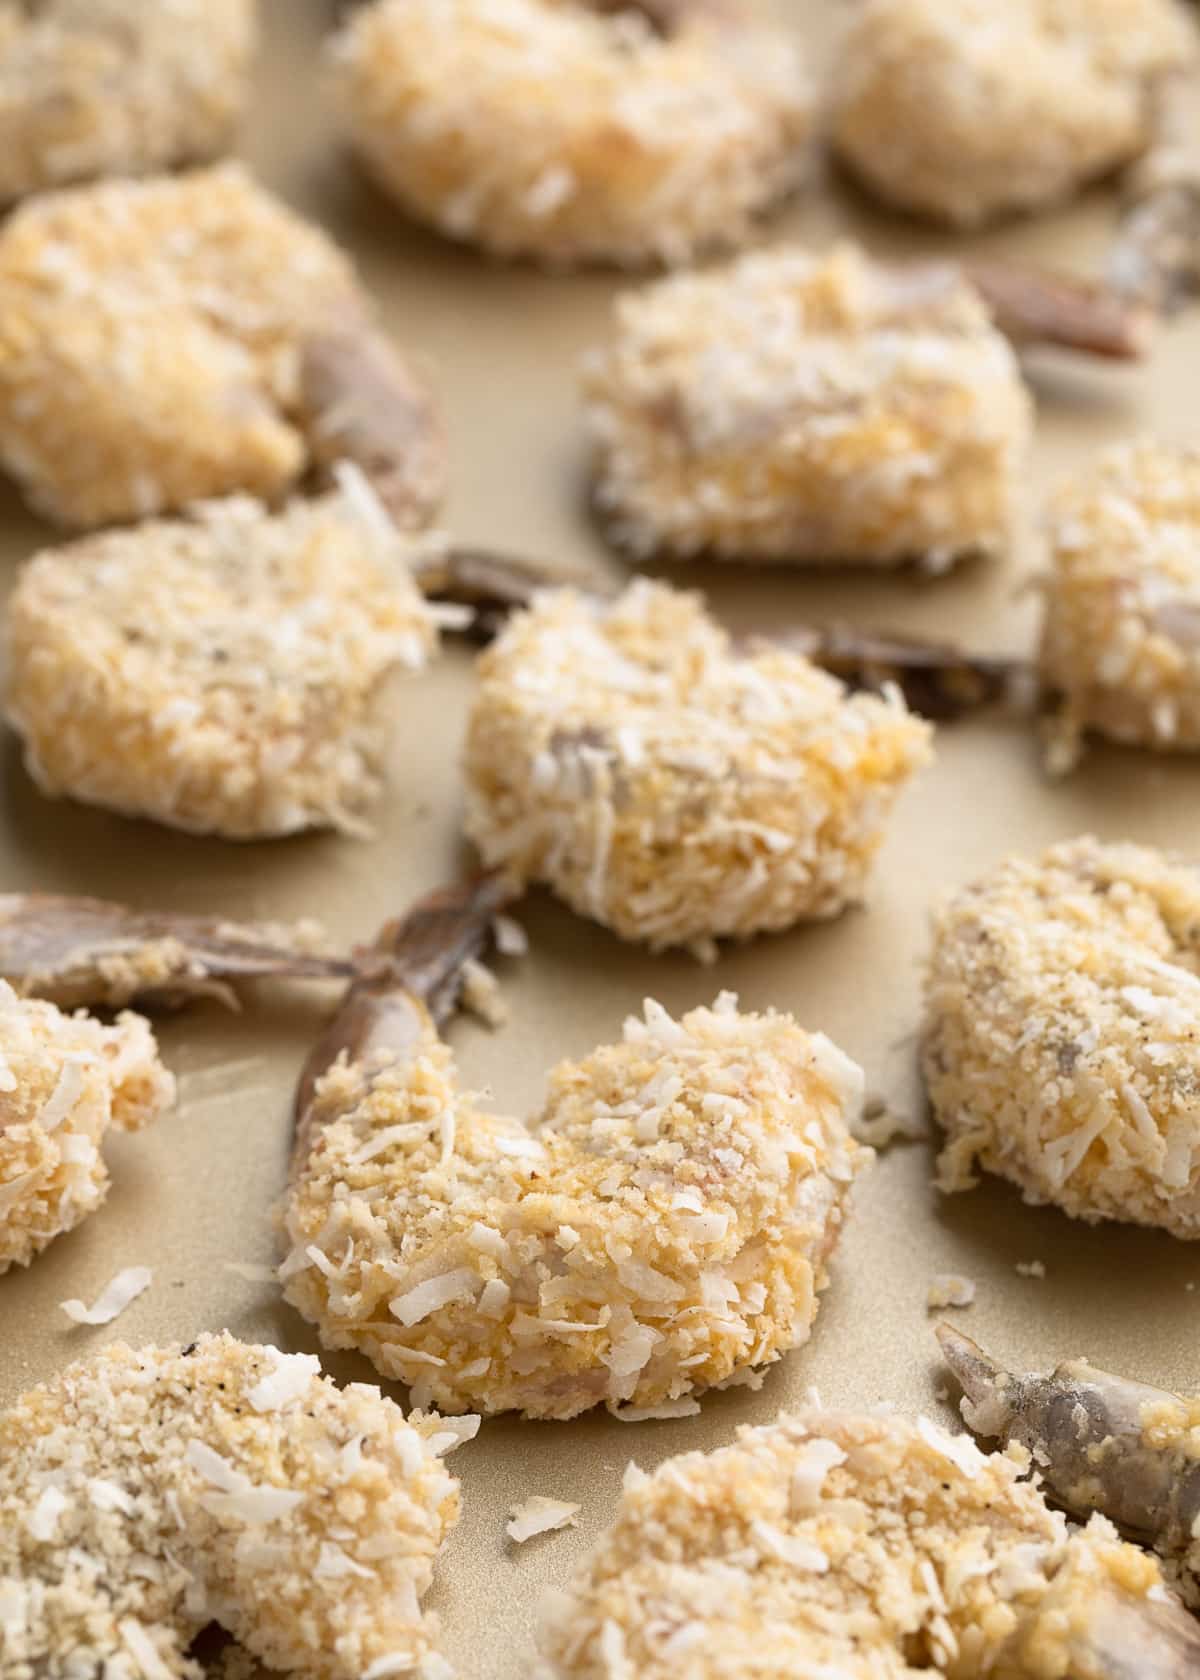
Make-Ahead Tip: If you’re serving Coconut Shrimp for a party, you can bread them in advance. Arrange the coated shrimp in a single layer on a baking sheet, cover with plastic wrap or foil, and refrigerate for up to 6 hours before cooking. When ready, cook them using your preferred method.
Step 2a: Deep Fry the Shrimp
To deep fry the shrimp, pour 2 to 3 inches of neutral frying oil (such as vegetable, canola, or peanut) into a high-sided, heavy-bottomed pot or an electric deep fryer. Heat to 350°F, using a clip-on thermometer to monitor the temperature if you’re frying on the stove.
Working in small batches (I fry 5 to 6 shrimp at a time), carefully lower the shrimp into the hot oil. I like to use a spider strainer {affiliate link} or long-handled slotted spoon for safety. Fry for 2 to 4 minutes, gently moving the shrimp around in the oil occasionally to help them brown evenly.
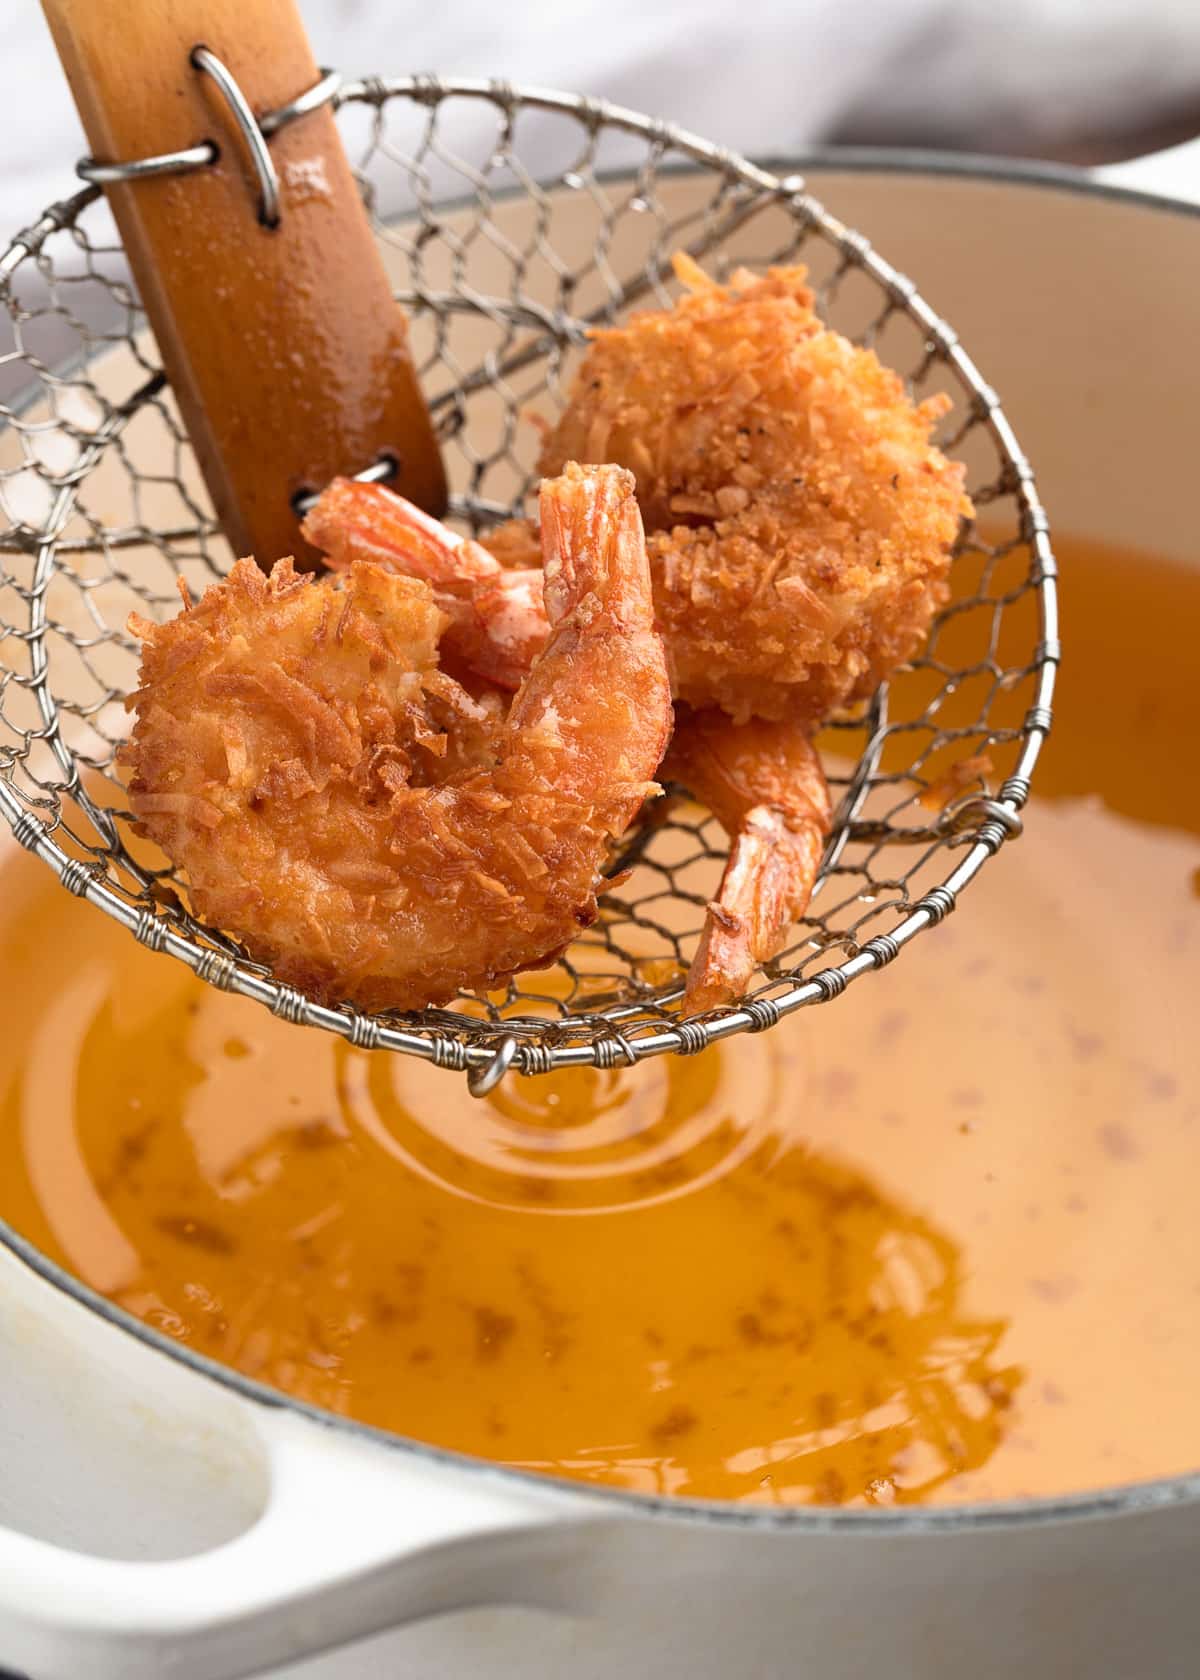
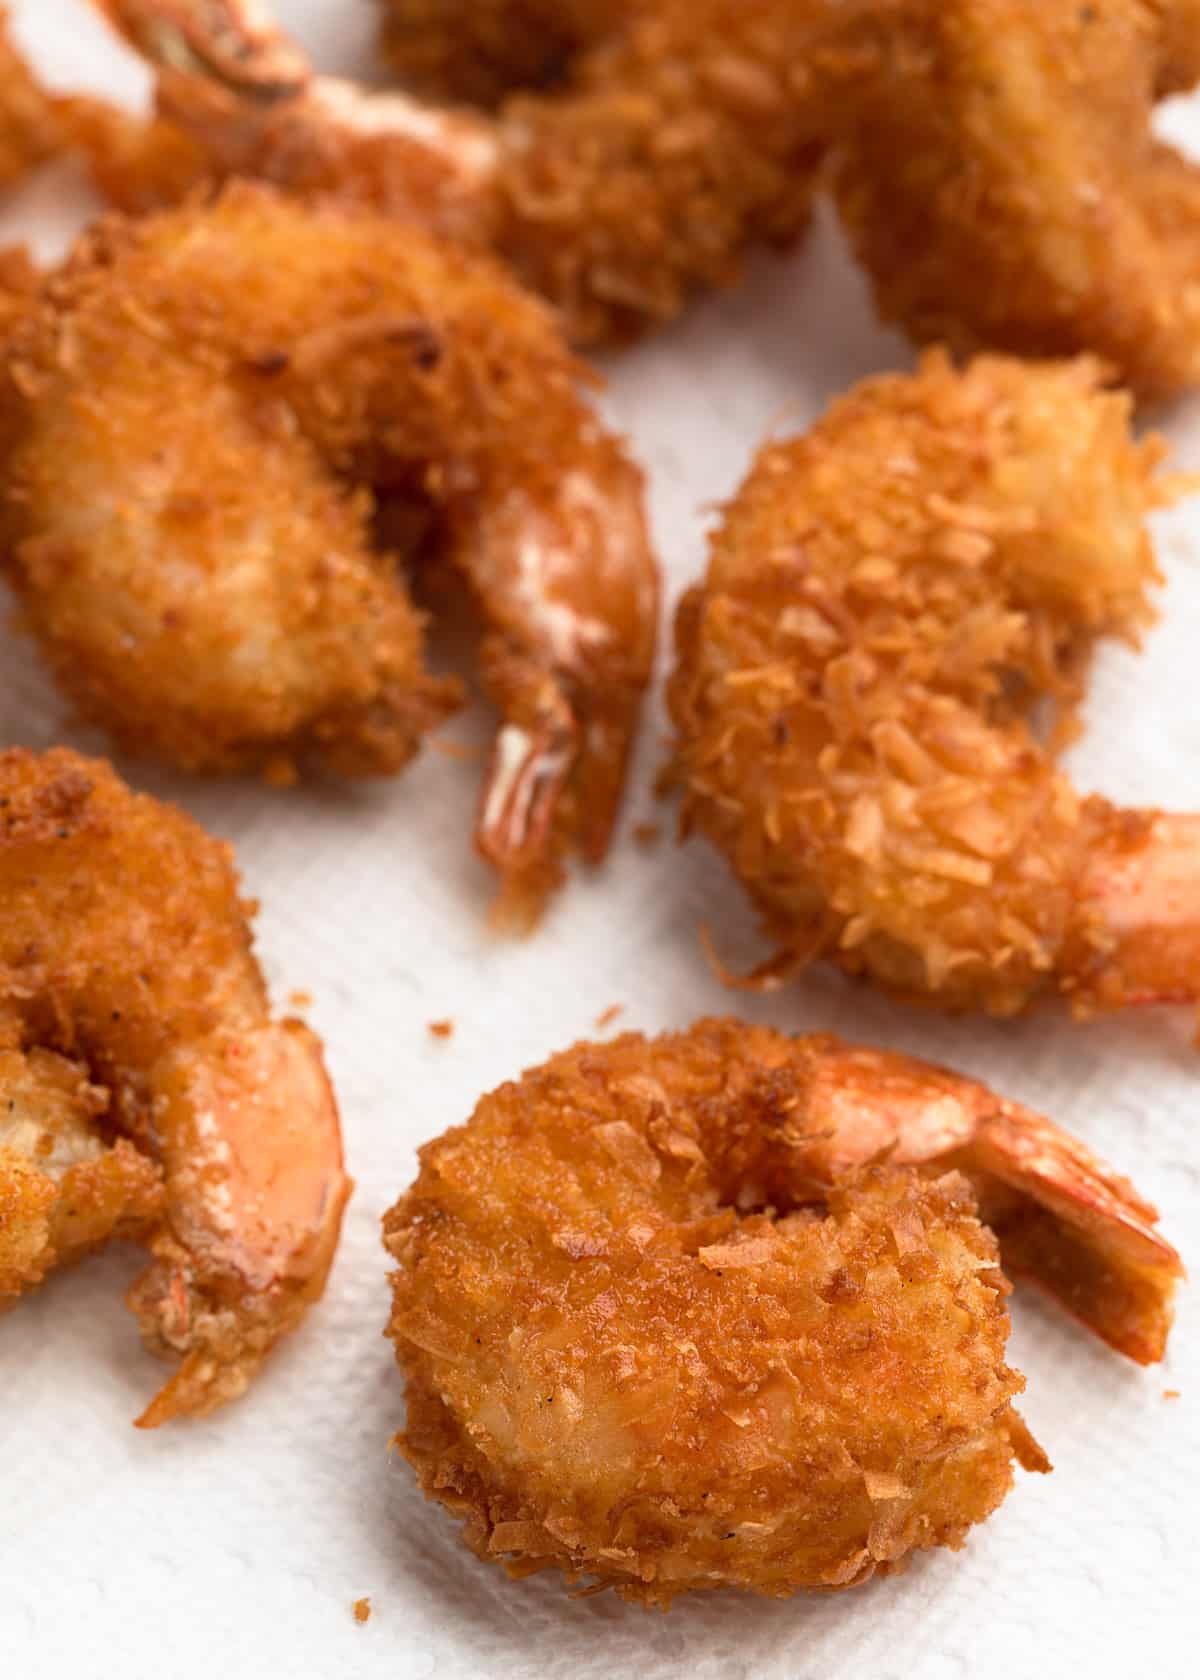
When ready, the breading will be golden, and the shrimp should be opaque throughout, with an internal temperature of 145°F on an instant-read thermometer.
Use your spider or slotted spoon to transfer the shrimp to a paper towel-lined plate or wire rack to drain excess oil.
Tip: The number of shrimp you can deep fry per batch will depend on the size of your pot. The 3.5-quart pot shown here fits 5 to 6 shrimp per batch, but adjust as needed. Avoid overcrowding the pot—frying too many shrimp at once will cause the temperature of the oil to drop too much, leading to greasy and unevenly cooked shrimp.
2b. Baking Coconut Shrimp
For a lighter alternative to deep frying, bake the shrimp on a sheet pan in the oven. This method uses significantly less oil than deep frying while still delivering a crispy breading.
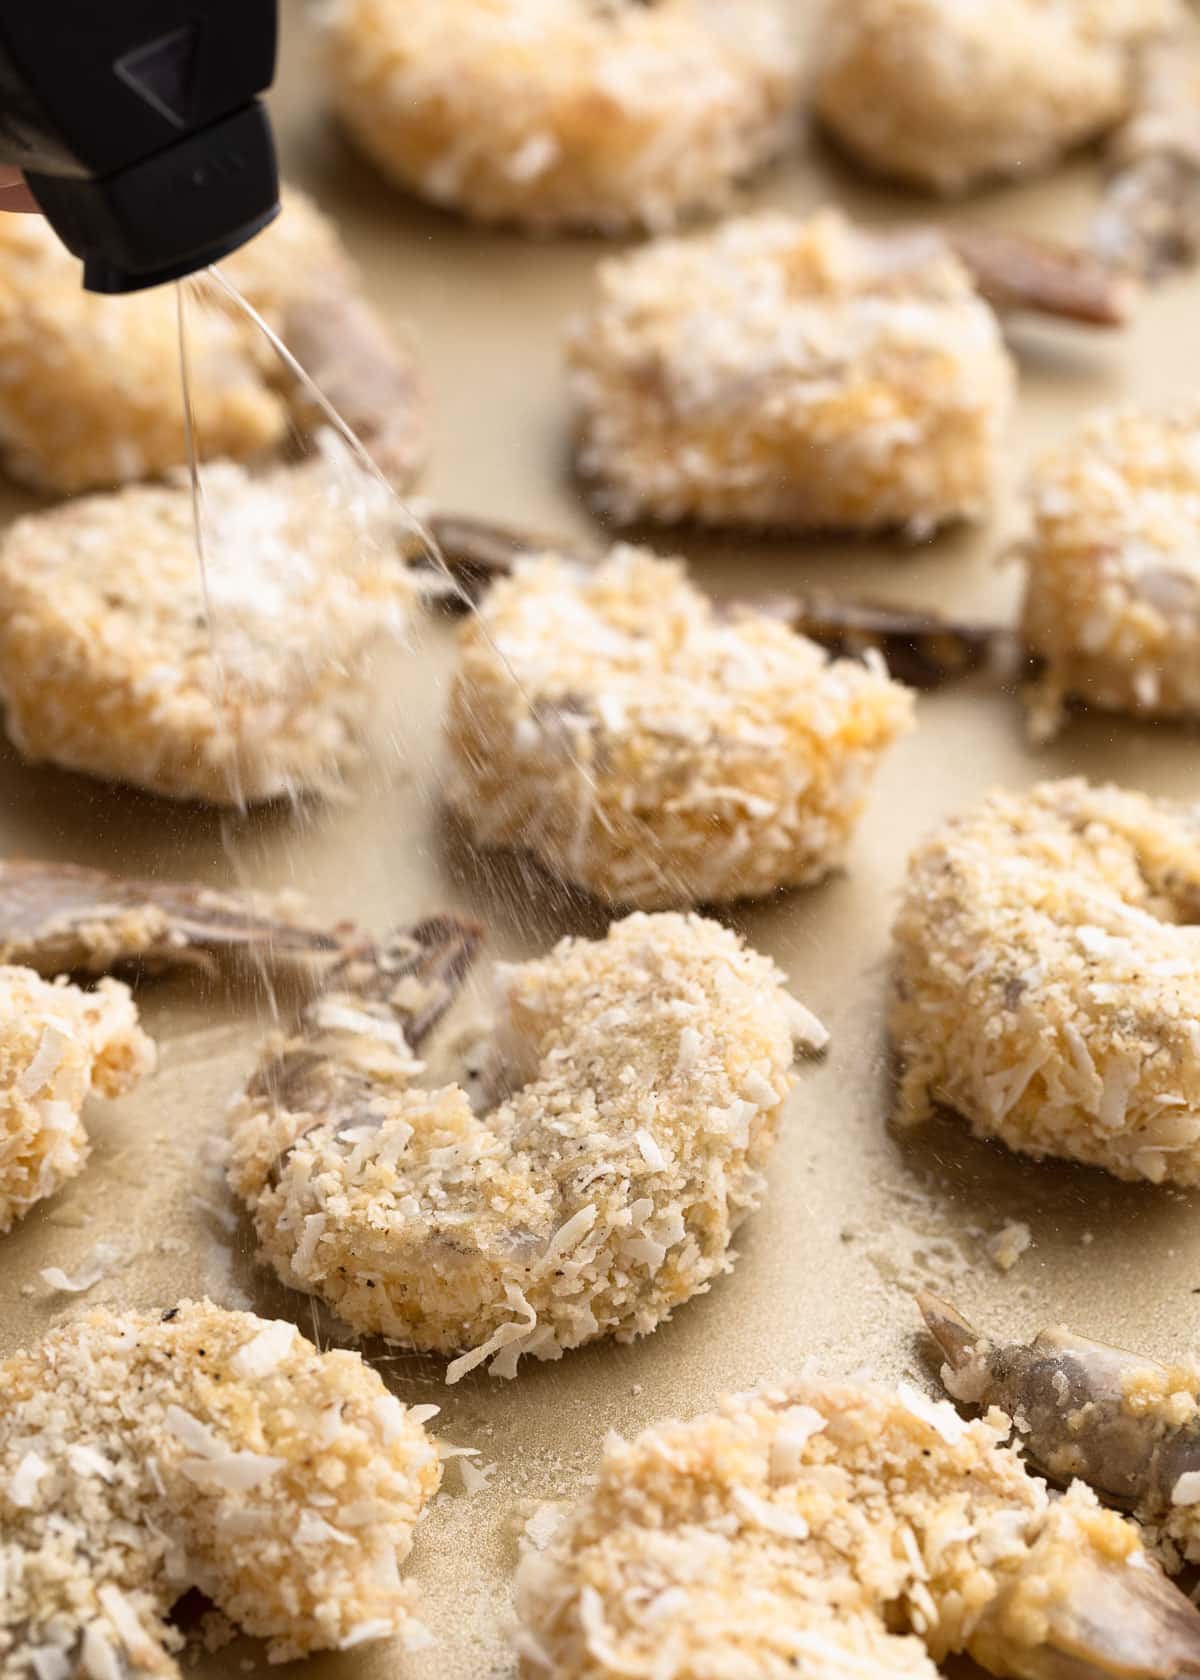
Preheat the oven to 425°F. Arrange the shrimp in a single layer on the sheet pan and spray both sides of each shrimp with neutral, high-heat cooking oil.
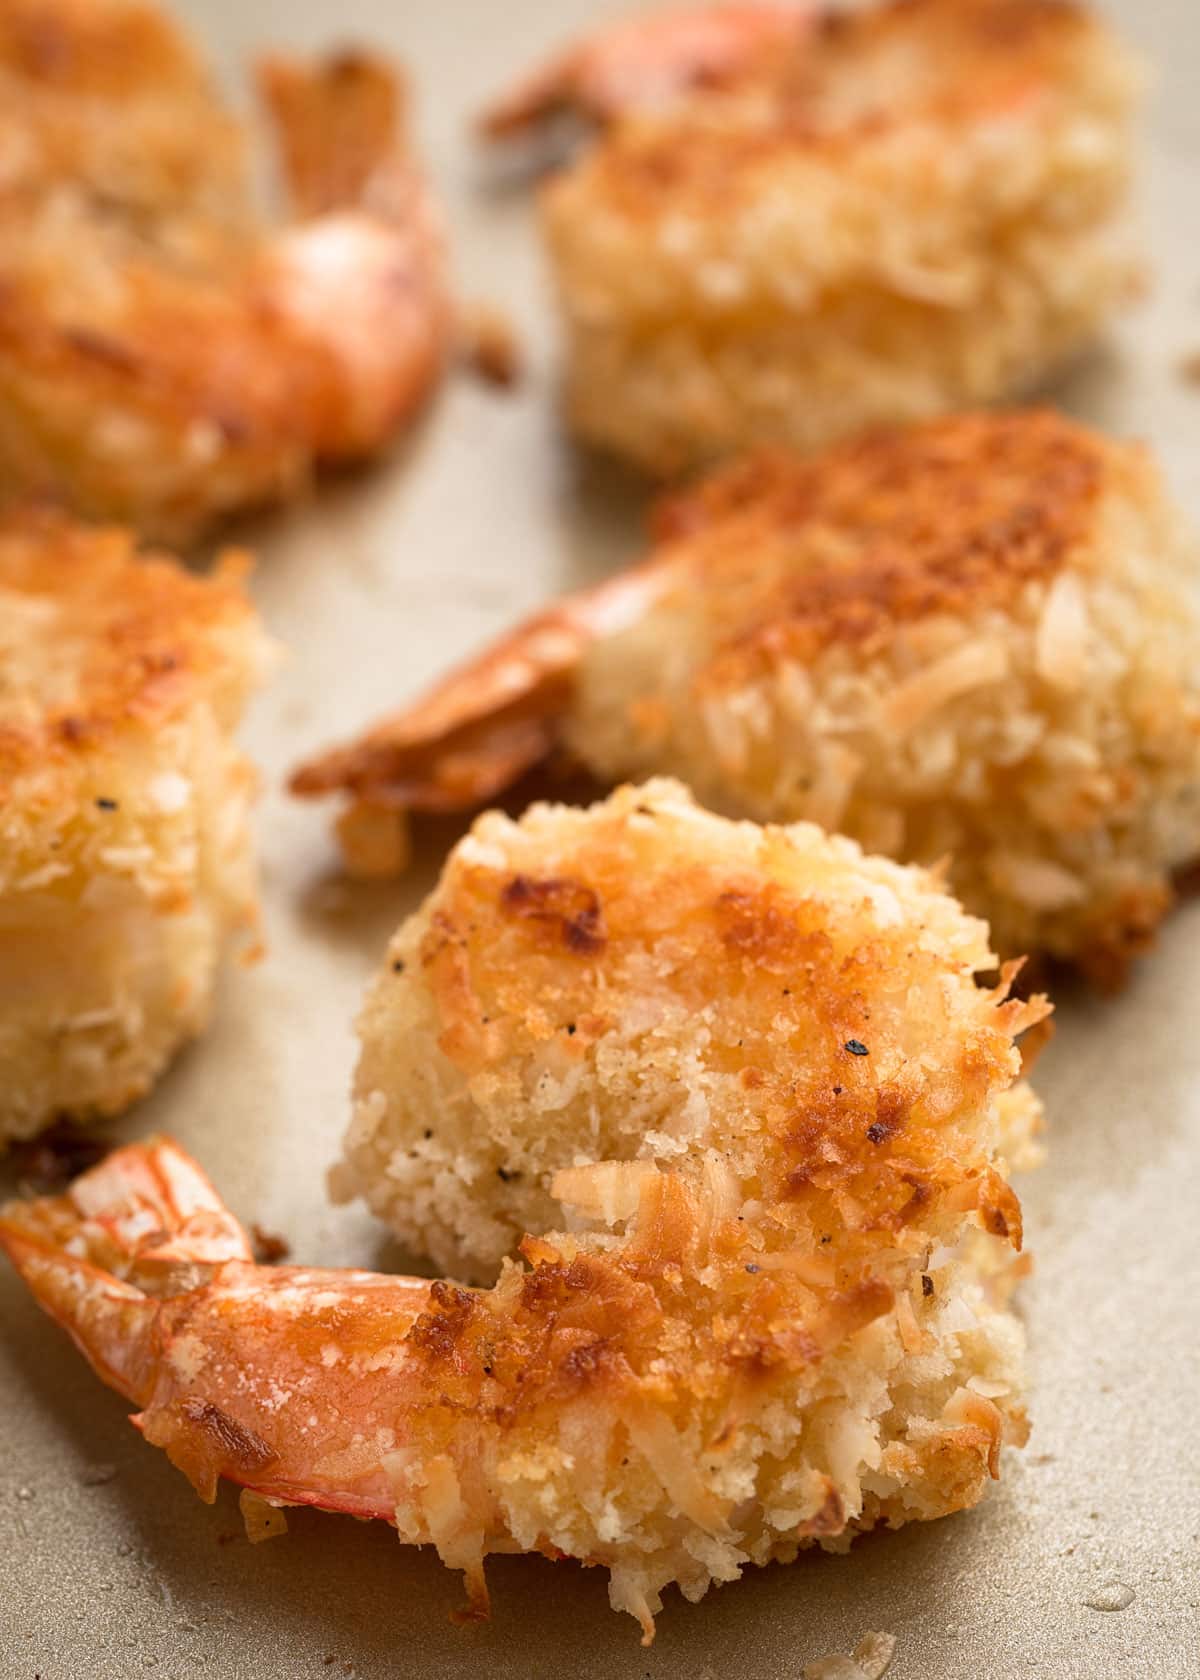
Bake for 8 to 10 minutes, flipping once, until the shrimp are cooked through and the breading is lightly browned.
2c. Air Frying Coconut Shrimp
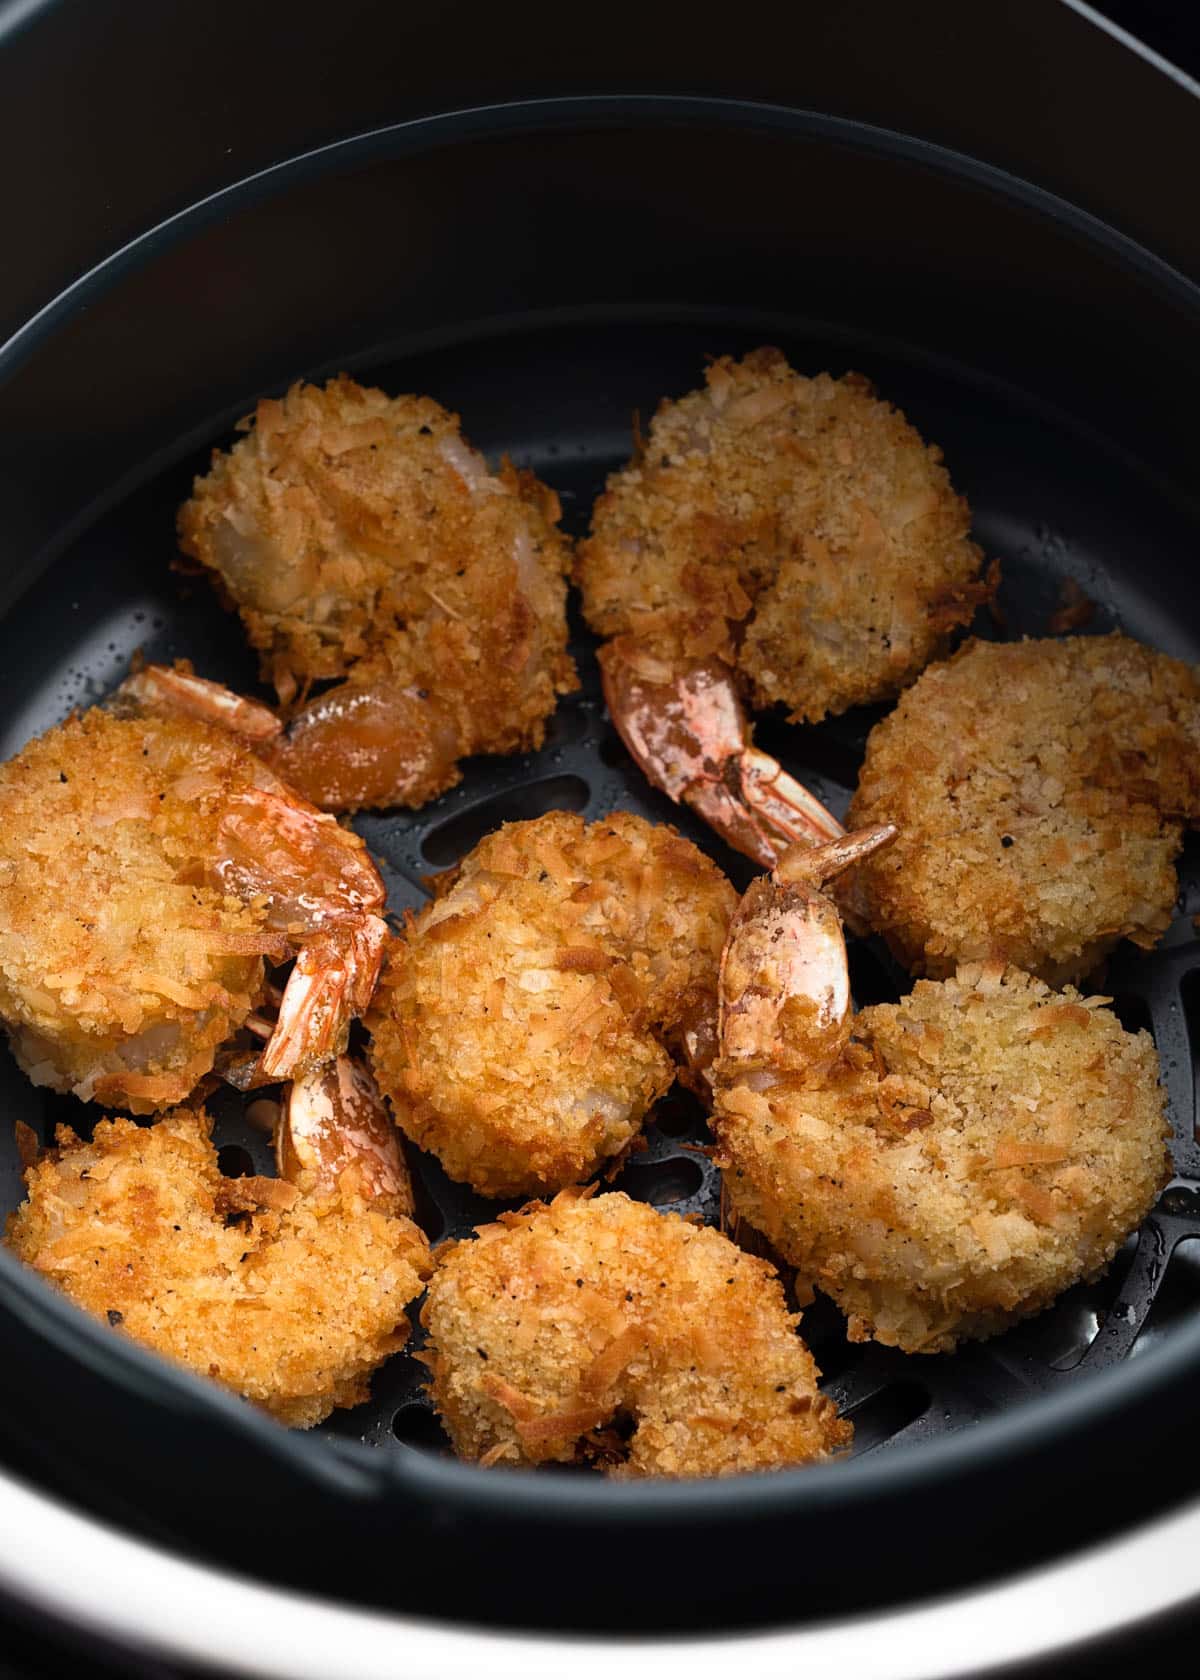
Air frying, which cooks the shrimp in a smaller space than the oven with a more concentrated airflow, provides a crispier texture than baking while still using less oil than deep frying.
Preheat the air fryer to 400°F according to the manufacturer’s instructions for your model. (For reference,my Ninja Pro XL air fryer recommends a 3-minute preheat.) Spray the shrimp on both sides with neutral cooking oil, just as you would for baking.
Arrange the shrimp in a single layer in the air fryer basket, leaving some space between them so the hot air can circulate and crisp the coating. If needed, cook in batches to avoid overcrowding.
Air fry for 6 to 8 minutes, flipping once, until the shrimp are golden and cooked through. If they look dry when you flip them, give the second side another light spritz of oil.
Keep an eye on the shrimp—air fryer cooking times can vary by model, so adjust as needed to prevent overcooking.
Comparing Coconut Shrimp Cooking Methods
Each method for making Coconut Shrimp has its own benefits, and the “best” one comes down to personal preference. Here’s what to expect from each:
- Deep-Fried Coconut Shrimp have the crispiest, most golden coating. They’re the most indulgent option, but they deliver that restaurant-quality crunch.
- Air-Fried Coconut Shrimp are the next crispiest, with a golden, crunchy coating behind deep frying, using significantly less oil.
- Baked Coconut Shrimp won’t be quite as crunchy or evenly golden as the other two methods. I find that the areas touching the baking pan will brown the most. They’re still a great option if you want a lighter alternative to deep frying and don’t have an air fryer.
Storing and Reheating
- Leftover Coconut Shrimp can be stored in an airtight container in the refrigerator for up to 3 days. They won’t have the same texture as fresh when reheated, but are still tasty.
- To reheat, warm them in a 350°F oven for about 5 minutes, just until heated through. For a crispier result, use an air fryer at 350°F for 2 to 4 minutes.
- Avoid reheating in the microwave, which can make the shrimp rubbery.
Be careful not to overheat when warming them up—overcooked shrimp can become tough and dry out.
How to Serve Coconut Shrimp
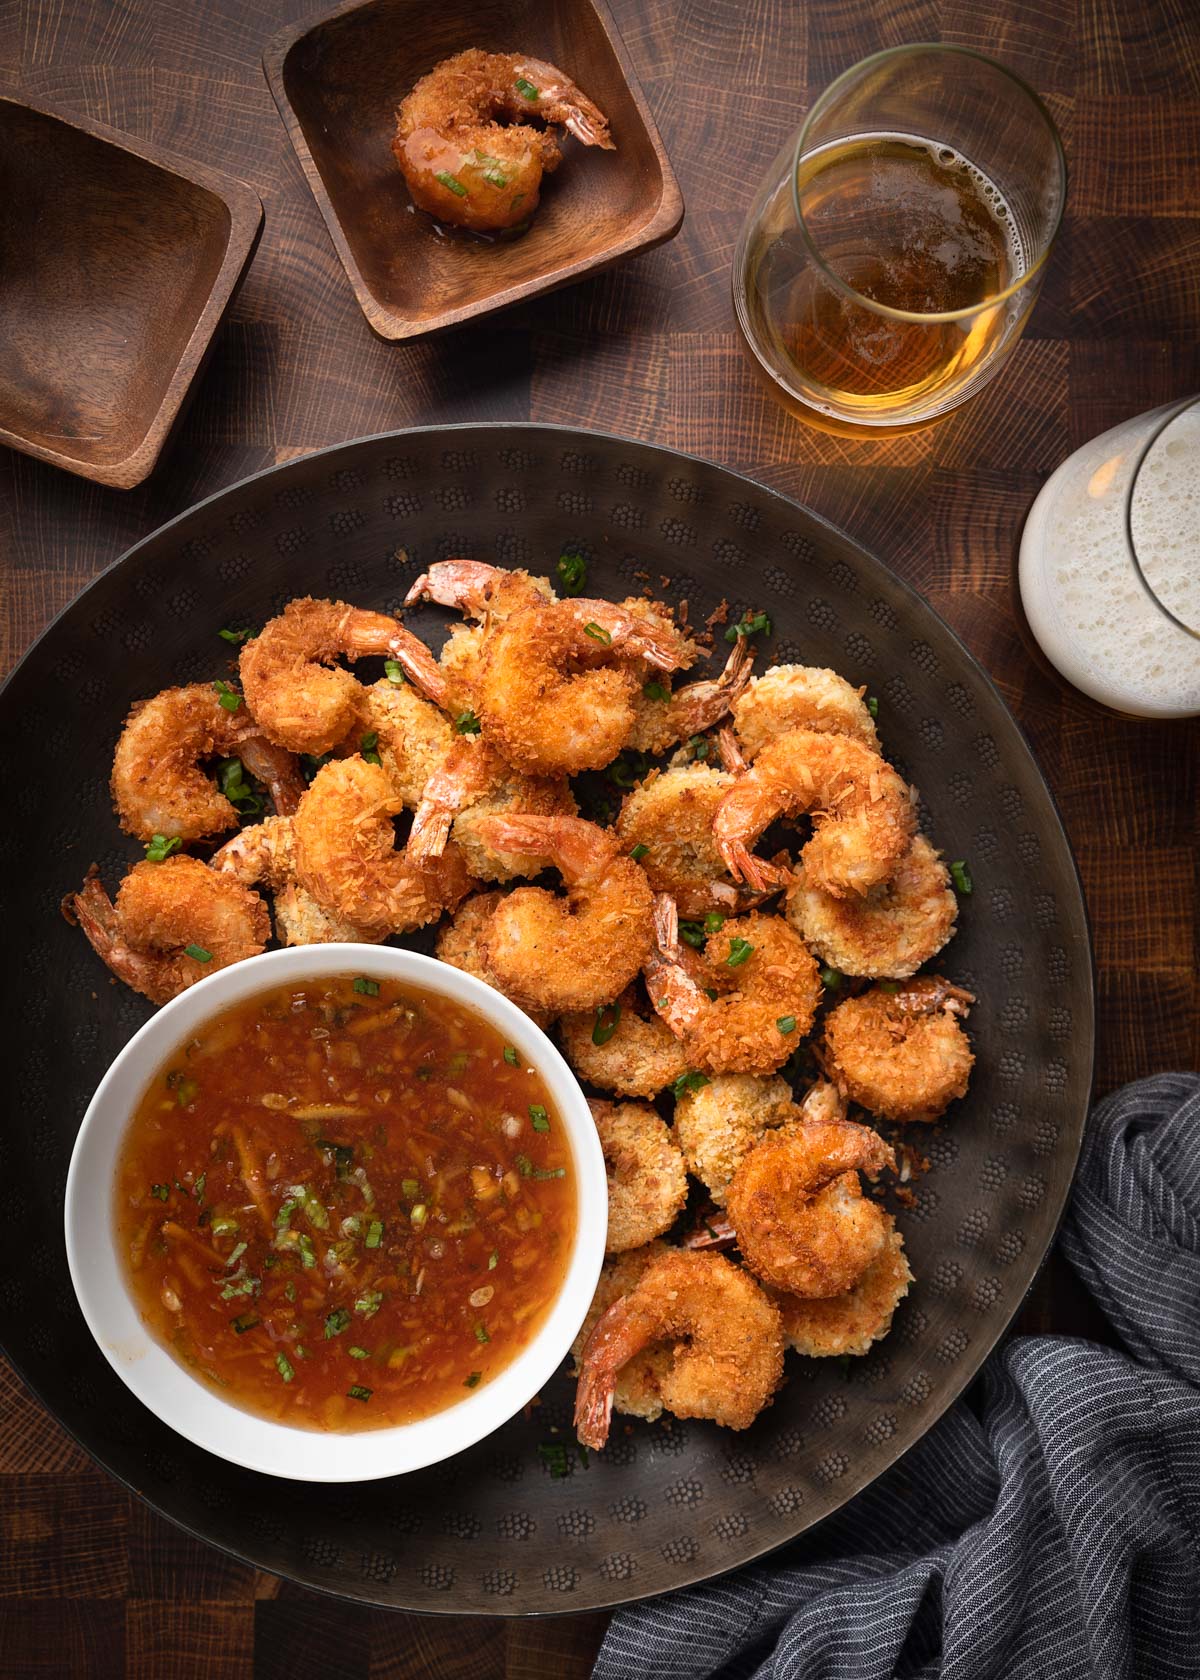
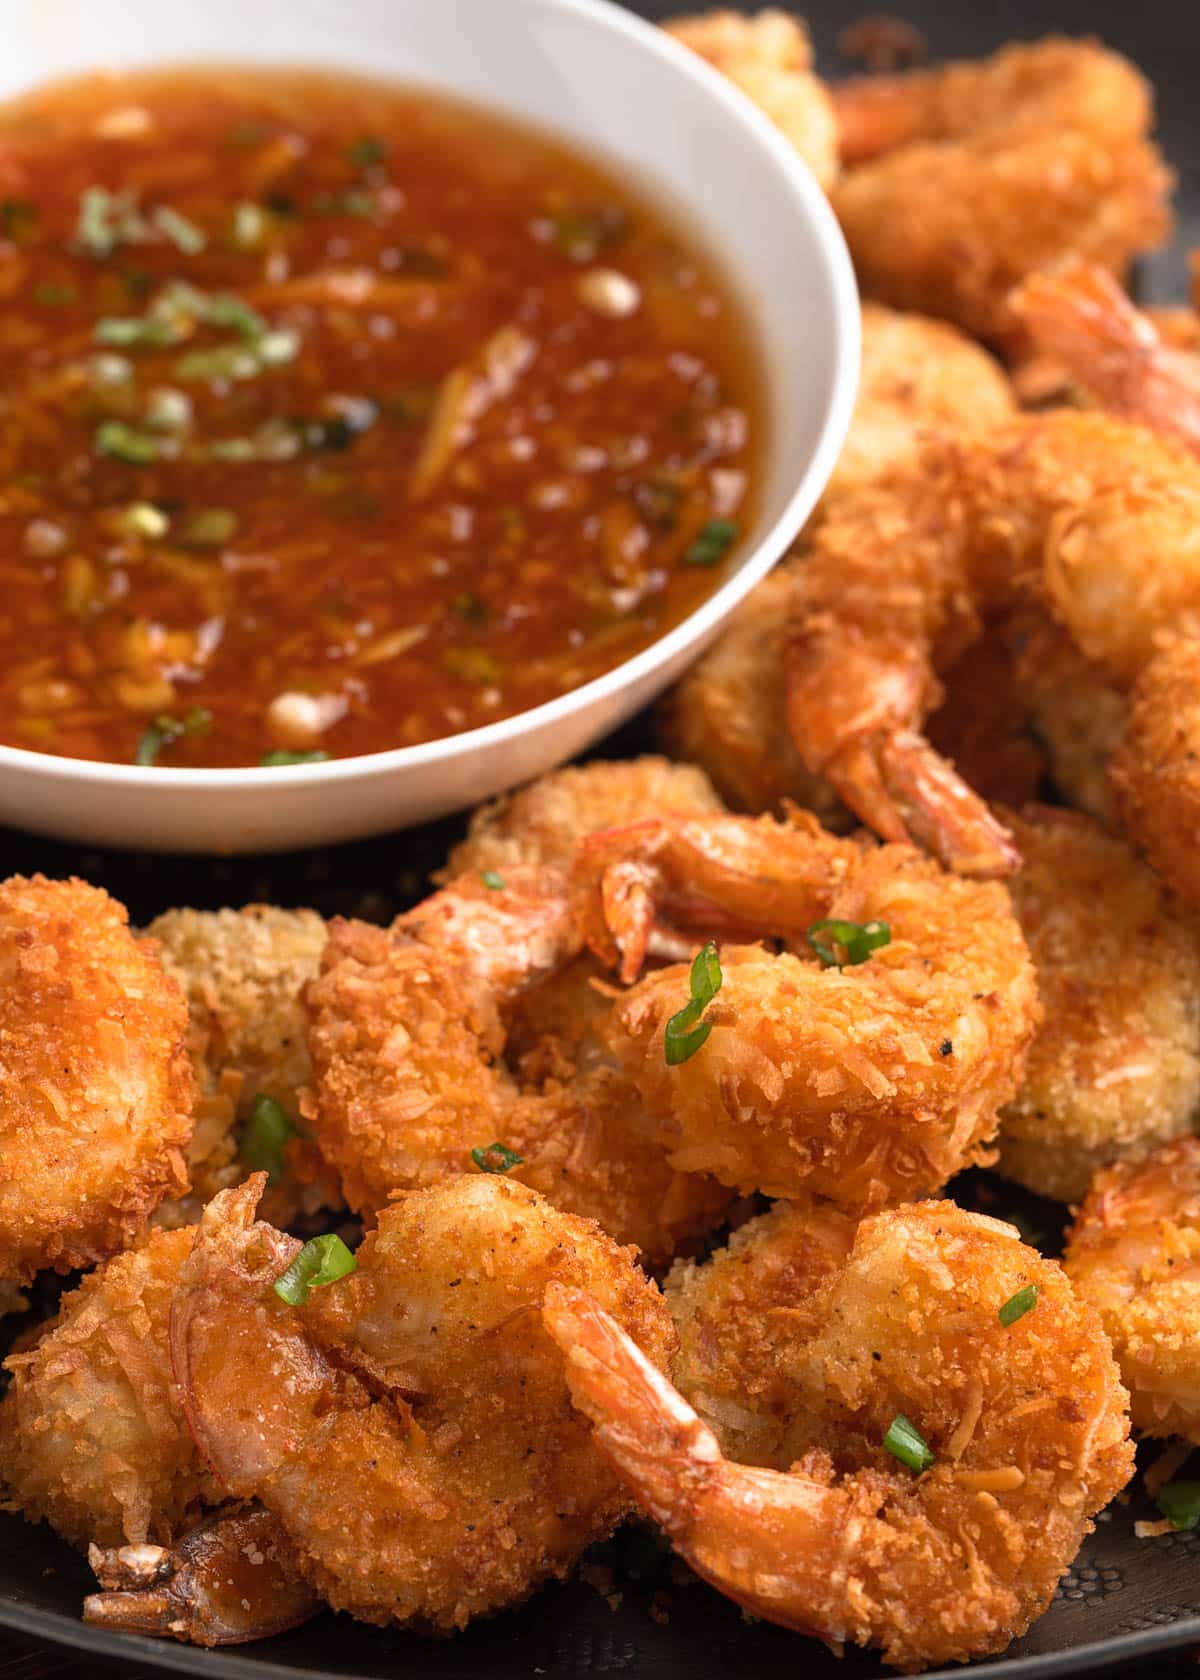
Coconut Shrimp are best served hot, soon after they come out of the fryer or oven. I like to sprinkle the platter with thinly sliced scallions or chopped cilantro. A squeeze of fresh lime juice is also a great way to add a pop of freshness.
My family loves these shrimp with a sweet-spicy dipping sauce, like my Orange-Chili Dipping Sauce (you can customize the heat level to taste). For a savory option, try them with my Creamy Cilantro Lime Sauce.
If you’d rather skip making your own dipping sauce, store-bought Thai Sweet Chili Sauce is a convenient alternative. Look for it in the International aisle at the grocery store.
More Shrimp Appetizers
- Bacon Wrapped Shrimp with Bourbon Glaze
- Air Fryer Shrimp
- Poached Shrimp (for Classic Shrimp Cocktail)
- Roasted Shrimp Cocktail
Craving more? Browse my full collection of Shrimp Recipes!

Coconut Shrimp
Ingredients
- 1 pound raw 16/20 count shrimp , deveined, shelled, tail left on
- ½ cup all-purpose flour
- 2 large eggs
- 1 teaspoon cool water
- ¾ cup unseasoned Panko breadcrumbs
- ¾ cup shredded coconut (unsweetened or sweetened – your preference; I use unsweetened)
- Diamond Crystal kosher salt and freshly-ground black pepper
- vegetable, canola, or peanut oil (for deep frying) or oil spray (for baking or air frying)
- thinly-sliced scallions or chopped cilantro , for garnish (optional)
- Orange Dipping Sauce , for serving
Instructions
All Cooking Methods
- Prepare 3 bowls for breading. Place flour in the first bowl with a pinch each of kosher salt and black pepper. In the second bowl, whisk together eggs and water. In the third bowl, combine panko and coconut with 1/2 teaspoon each kosher salt and black pepper.
- Pat shrimp with paper towels to remove excess moisture. One at a time, dredge shrimp in flour, shaking off excess. Dip into egg wash, allowing excess to drip off. Roll the shrimp in the coconut-panko mixture, gently pressing to adhere.
To Deep-Fry
- Heat 2-3 inches of oil in a heavy-bottomed, deep pot to 350°F. Fry shrimp in batches of about 5-6, being sure not to crowd the pot, until the breading is golden and the shrimp are opaque throughout, about 3-4 minutes. Use a spider strainer to gently move the shrimp around in the oil for even browning.
- Remove shrimp from the oil with the spider strainer and place them on a double layer of paper towels set on a plate or baking sheet to drain.
To Bake
- Preheat oven to 425°F with rack in the lower-middle position.
- Place breaded shrimp in a single layer on a baking sheet. Spray both sides of each shrimp with vegetable oil spray (I use an oil spray bottle), or another high-heat neutral flavored oil spray of your choosing.
- Bake for 8-10 minutes, until the breading is light golden and the shrimp are opaque throughout, turning the shrimp over once halfway through baking.
To Air-Fry
- Spray breaded shrimp on both sides with vegetable oil spray, as in the baking method. Add shrimp to the air-fryer basket in a single layer with a little space between each (cook in batches if needed).
- Air fry at 425°F for 6-8 minutes, until breading is golden and shrimp are opaque throughout. Flip the shrimp over once during cooking.
To Serve
- Place Coconut Shrimp on a serving platter and garnish with sliced scallions or chopped cilantro, if desired. Serve hot with your favorite dipping sauce.
Notes
Nutrition Estimate
Nutrition information is automatically calculated, so should only be used as an approximation.
Please note that our recipes have been developed using the US Customary measurement system and have not been tested for high altitude/elevation cooking and baking.
You may also like:
Dips & Spreads
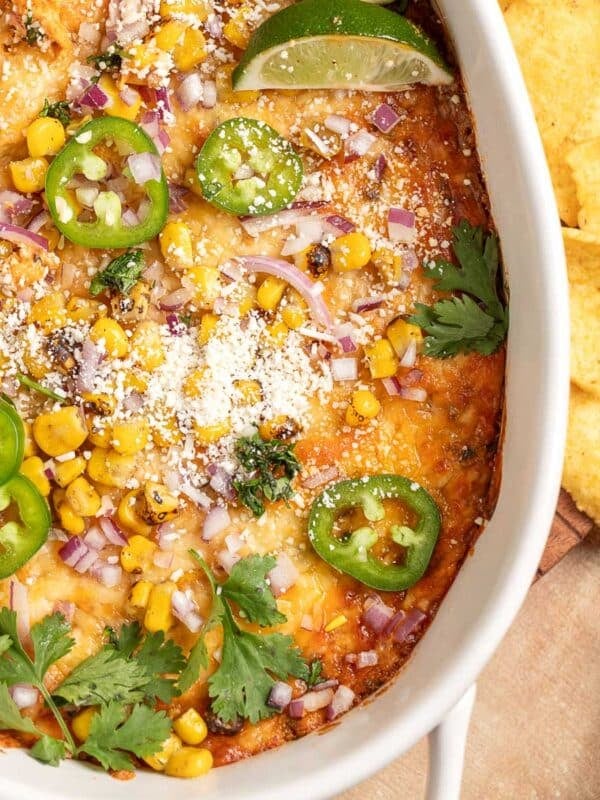
Mexican Street Corn Dip
Dips & Spreads
Crab Rangoon Dip
Dips & Spreads
Chorizo Bean Dip with Chipotle

Appetizers
Deviled Ham
Editor’s note: This recipe was originally published on Striped Spatula in January 2020. We have since updated the blog post with improved copy to best serve our readers.

You say to spray each side of the shrimp with oil AFTER you bread them! Isn’t that a bit impractical as you just placed them on the baking pan?
Not impractical at all. They’re sprayed with oil to help the breading crisp and brown without deep frying. You bread the shrimp, place them on the baking sheet, spray them all on one side, flip them over, spray the second side, and bake. Spraying the shrimp before they’re breaded would defeat the purpose.
Great recipe ! I did the air fryer method!👍👍
Followed the recipe as written and baked them – so good! Definitely putting this on the dinner rotation. Thank you!
Liked the shrimp done in the air fryer.
Hint to defrost shrimp just put the in a bowl, cover with cold tap water, let sit 8 minutes, change water and let sit 5 minutes more.